
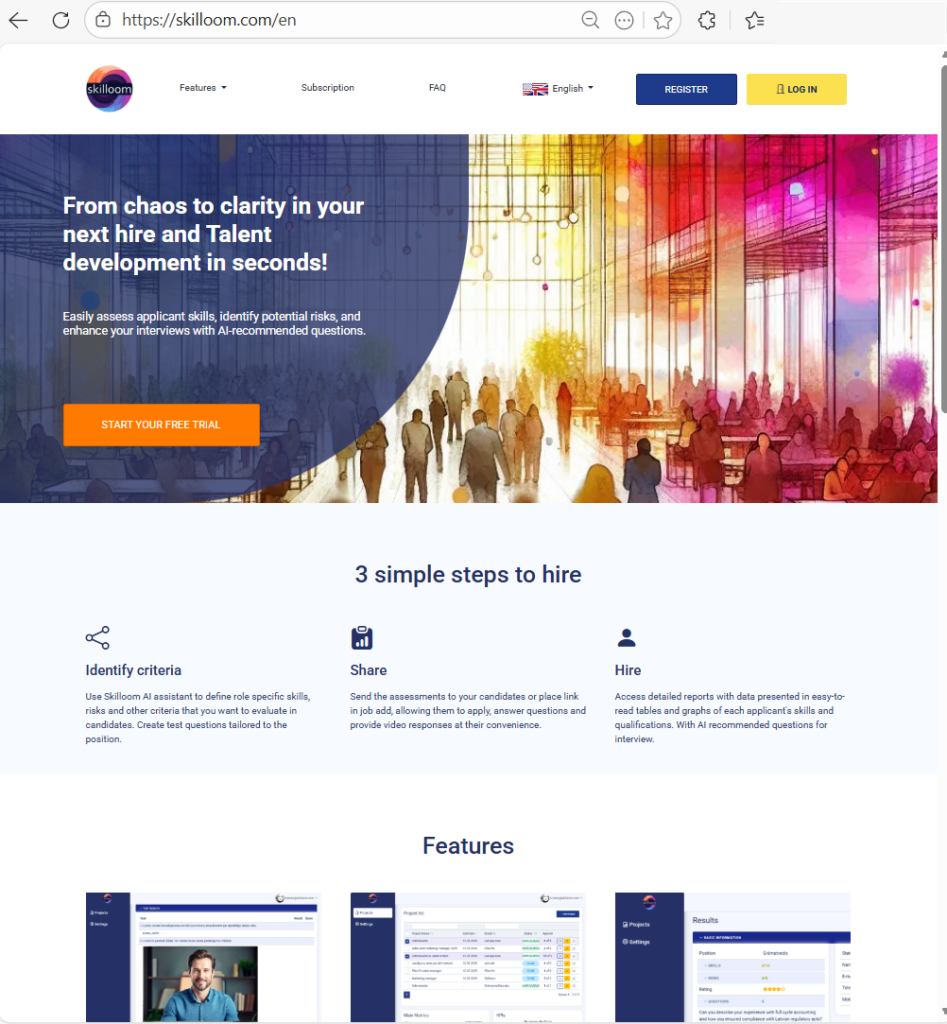
Welcome!
Thank you for choosing Skilloom! We are glad to welcome you.
This manual explains how to use Skilloom to run hiring projects, review applicants and build simple onboarding and development plans. It uses plain language and short steps.
For any questions you can reach us:
E-mail: support@skilloom..com
WhatsApp: (+371) 2662-2352
Thinking about terms and compliance, please read or Terms.
Starting
Firstly we kindly invite you to Create a user account.
This will allow you to connect to Skilloom in your private and secure work environment.
While registering, create an Organization where you will be able to work with your projects and invite for co-working your colleagues or external users, as clients, for digital co-working on projects with limited access rights to shared projects.
Go to skilloom.com and choose to Sign up.
After completing the registration form, You will receive an e-mail confirmation message. Confirm your e-mail address. And your private work environment will be prepared in Skilloom under My projects.
If you already have an account, use Log in.

Add Users
Co-working
When you Sign up in Skilloom without invitation from already registered Organization, you create a new Organization with it’s own work space.
To work in joined work space you have to join an existing organization from invitation or invite users to join your Organization.
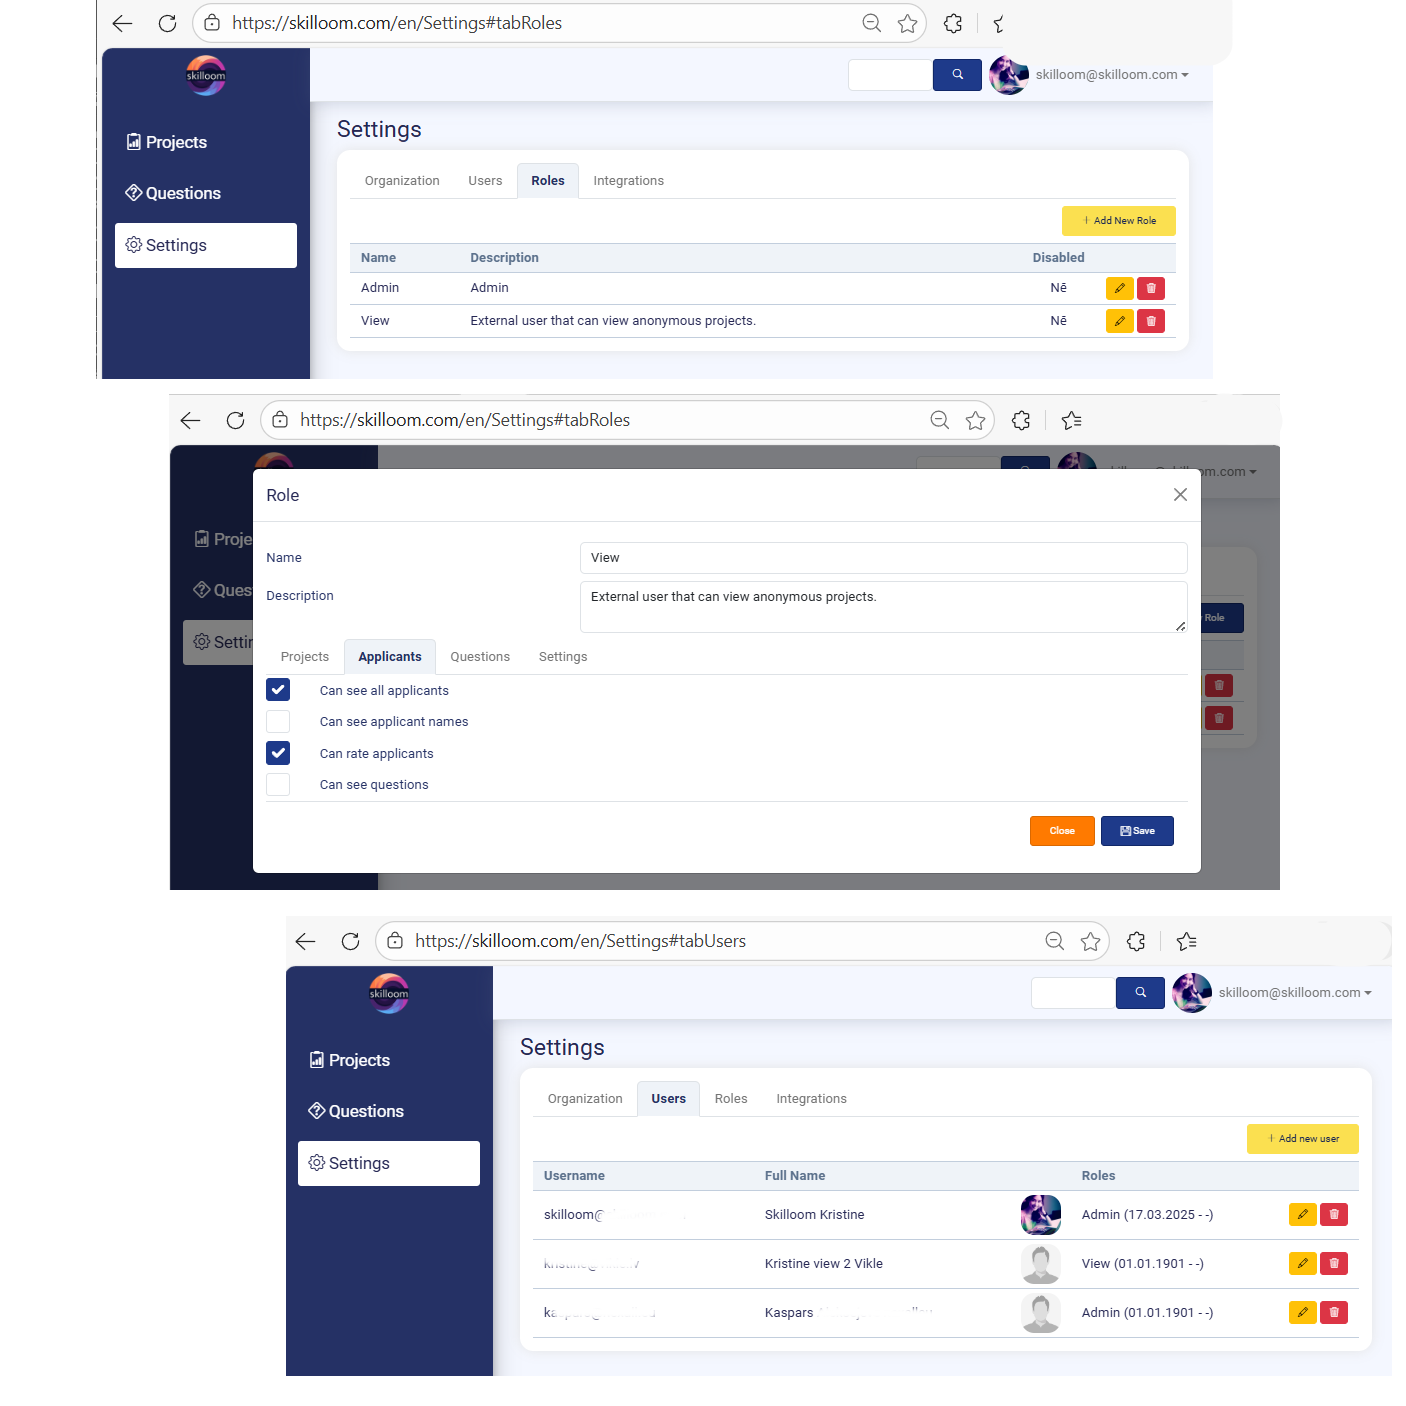
To add users to your Organisation go: Settings → Roles. There you will be able to add new roles with access limitations for newly added users.
When the role is defined, you can add a user, go: Settings → Users.
Add new user. Set the role. Set time limitation or leave the time limitation empty, it will give access that is defined in role but unlimited in time.
Added user will receive an e-mail with information about joining your organization and link for e-mail address approval, that will complete the user joining process.
The same user can be added to several Organizations. User can change the work environment and organization under: User profile → Switch organization.
Share the project with user
When you have added users to your Organization, you can invite them to see separate Projects. Open the Project in view mode and in the bottom section use Invite functionality. Choose User → Add → Save.
After invite user will see the project in it’s Project dashboard.
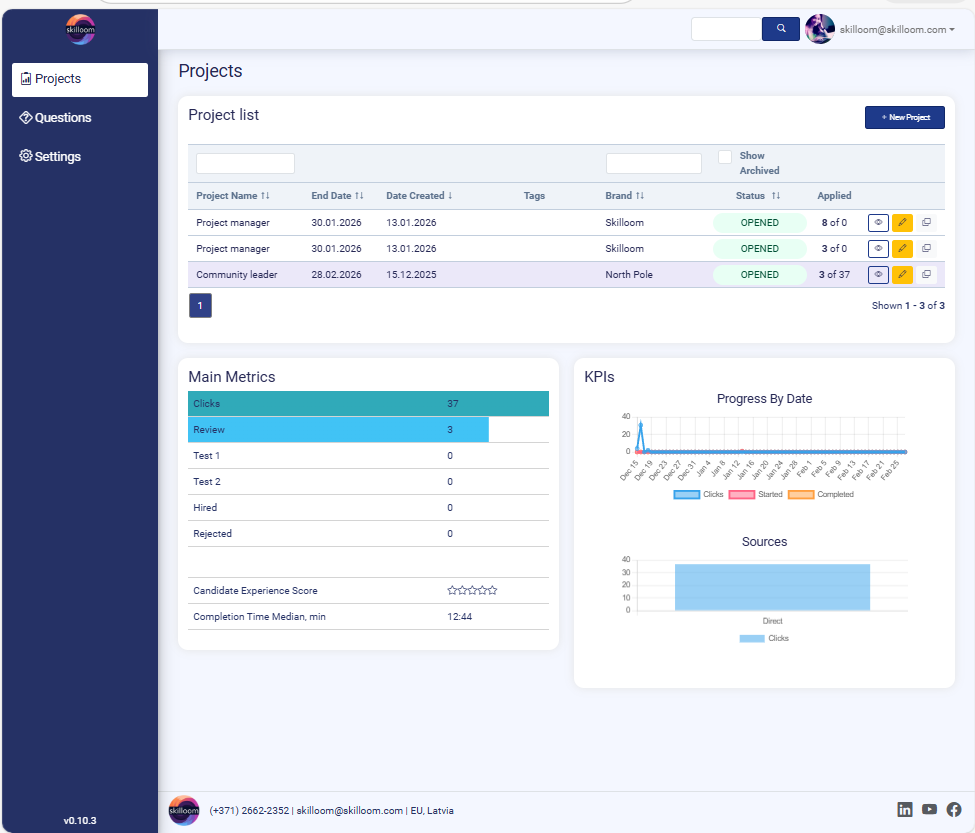
Project list
Project List is the main overview page where users can quickly see all recruitment or assessment projects and track their progress in one place.
Project Name – the name of the vacancy or project.
End Date – the planned closing date of the project, this indicates the date till when the applicants will be able to apply .
Date Created – when the project was created in Skilloom system.
Tags – optional internal labels (if used).
Brand – the brand or campaign name used for the project. This can be also a name of company or client. This name will be included in application link, so do not change it after you publish the project, as it will cause the inaccessible application link.
Status – current project status. If project has not been finished and all information, like name and end date entered it will have status – Pending. If the project information is entered and project is saved the status will be – Opened. If the project date has expired, the status changes to – Closed.
Applied – number of candidates who have applied vs total clicks.
Search fields above the table allow quick filtering by project data.
Show Archived checkbox allows switching between active and archived projects.
New Project button creates a new project.
View – open project details and work with applications.
Edit – update project settings, change descriptions and visualizations. Note – do not change Brand field if the project is already published, as it will change the project link.
Delete – remove the project. You will be able to remove the project. this function will be accessible only if there are no applications or assigned users. If project already has applications, you have to delete them first and remove active user Invites to be able to delete the project.
Main metrics panel shows the amount of clicks, click timeline and sources, so the user immediately understands activity and progress in selected projects.
Candidate Experience Score – quick rating indicator shown as stars, how applicants evaluate their experience after completion of application.
Completion Time Median (min) – typical time a candidate needs to complete the process.
Conversion rate (%) shows what percentage of candidates who started the process successfully completed it.
Define Project
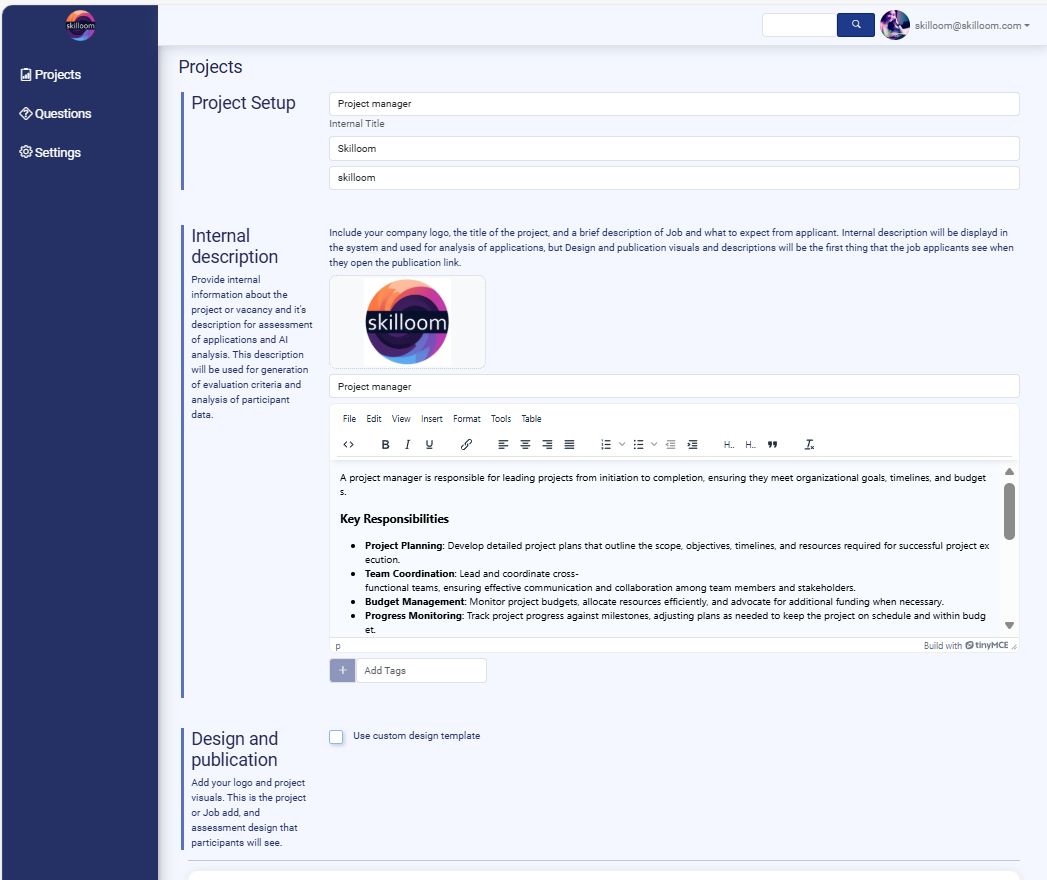
New Project button creates a new project.
Project Setup is the main Information section where you define the key details of a recruitment or assessment project before publishing it to candidates. This information is used internally by your team and also supports Skilloom’s automated evaluation logic.
At the top of the page you enter the project’s basic identification fields:
Internal Title – the working name of the vacancy/project inside Skilloom.
This helps your team recognize the project in the project list and reports.
Brand name – the brand or campaign name used for the project. This can be also a name of company or client. This name will be included in application link, so do not change it after you publish the project, as it will cause the inaccessible application link..
Project reference is created automatically from brand name and it is included in the assessment link.
Internal Description – this is the most important content field for defining the project in detail. This description can include more information than publication and this is used for AI analytics as context for evaluation criteria generation, onboarding and learning plan creation.
What to include in internal description? You can add content such as: short role overview, responsibilities and tasks, expectations for applicants, key skills, experience, and requirements, any additional internal notes that help with evaluation.
The description editor supports formatted content (headings, bullet points, links, etc.), making it easy to structure the vacancy information clearly.
Tags (Optional) – below the description you can add tags to categorize the project. Tags help with internal organization and filtering across multiple projects.
Design
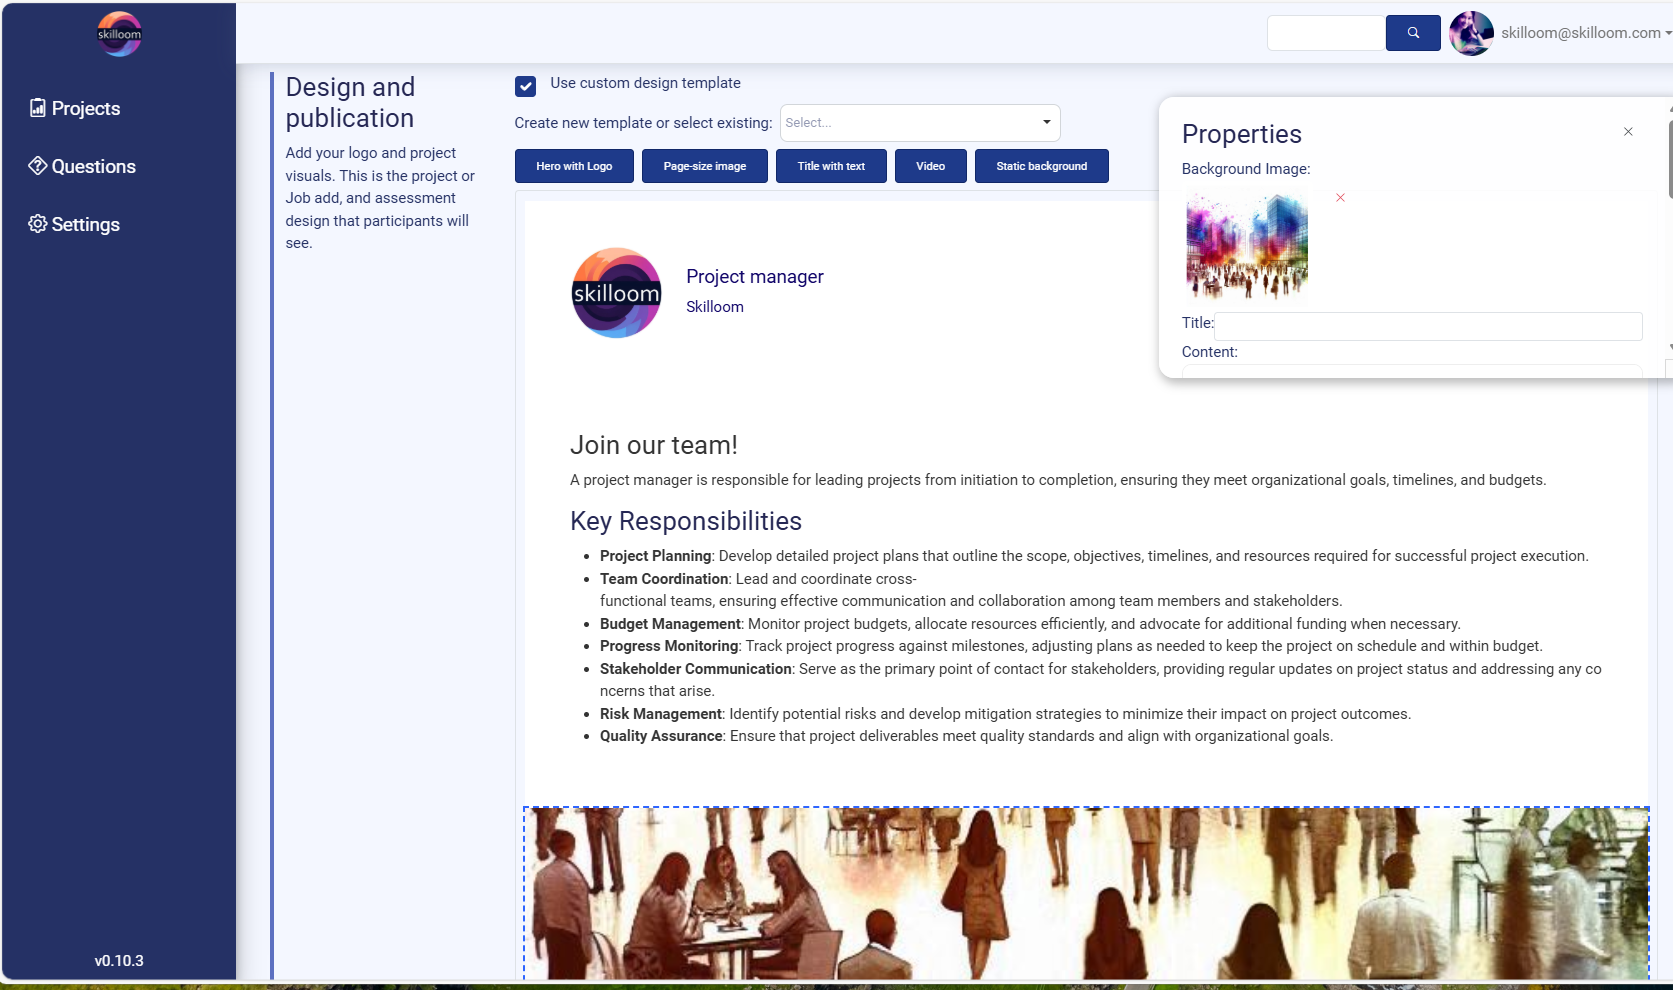
Project Design Constructor is used to create the candidate-facing look and layout of your project page of vacancy or assessment. This is what applicants will see when they open the project link, so you can match it to your company branding and make the experience clear and professional.
This page allows you to build the visualization using content blocks or use existing designs by uploading them. Design works can be saved in templates for next time, to streamline your job and adjust only details of the new project.
Tick “Use custom design template” to activate the design constructor.
Choose layout blocks. You will be able to delete them afterwards.
Skilloom provides several ready layout blocks (buttons at the top), for example:
Hero with Logo – header area with company logo and key project info.
Page-size image – full-width image style layout.
Title with text – simple structured text-focused layout.
Video – allows using video as part of the project intro.
Static background – uses a fixed image background for branding and let’s overlay other design blocks.
In the centre you see a real-time preview of how the project will look for candidates. After saving the project you will be able to open link in your device browser to test the design look and adjust and edit it after saving or even after publication, if any mistakes show up.
Hiring stages
Project Stages setup allows you to define how candidates will move through your hiring process from application review to tests, hiring or rejection. This helps your team work with a clear structure and ensures candidates receive the right actions and communication in each stage.
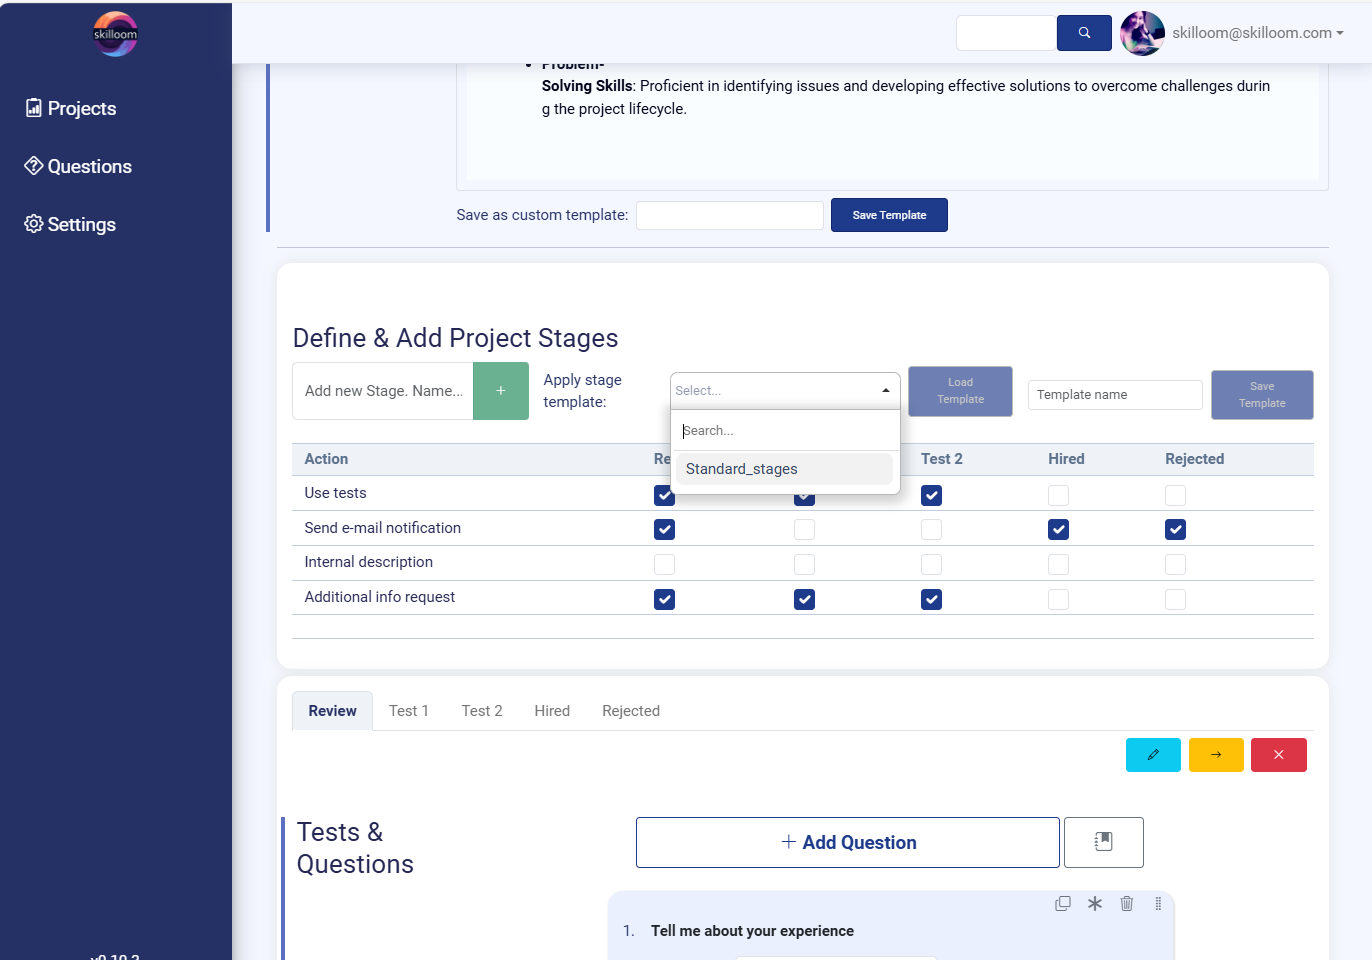
Define & Add Project Stages
This section is used to create and manage the stages of a hiring project.
You can add a new stage by typing in a stage name and adding it to the list of stages. Stages become visible as tabs. Selecting the needed tab of the stage, you can move it with arrows and change the stage flow.
2) Use a stage template (optional)
Skilloom lets you to save your hiring project stage templates and next time apply a ready-made stage structure instead of building it from scratch. To do that choose a template from “Apply stage template” dropdown and click “Load Template” to apply it.
You can configure actions per stage (matrix settings), under the stage tabs, Skilloom shows an action table where you can turn key options ON/OFF for each stage. Available actions are:
Use tests – enable assessment tasks in that stage and shows you a constructor for test building or loading them from template.
Send e-mail notification – automatically send candidate emails when they enter that stage. Optional – automatic e-mail notifications for candidates, when they exit the stage or complete the assessment.
Internal description – enable internal notes visible only to HR/team. This is needed, if you want to save any notes that are different from main internal description.
Additional info request – request extra information from candidates during that stage. As default, Skilloom requests Name, Surname and e-mail address that is an identificator of the candidate.
On the right side of the stage row, you can use quick controls to edit, move or delete the stage. You can not return deleted stages. If any backup files are needed, please reach out to our support: support@skilloom.com
Assessments and tests
Assessments and test functionality allow you to access constructor to create questions for candidates.
Each stage can contain its own set of questions and assessment tasks.
This means you can build a step-by-step evaluation flow instead of sending all questions at once.
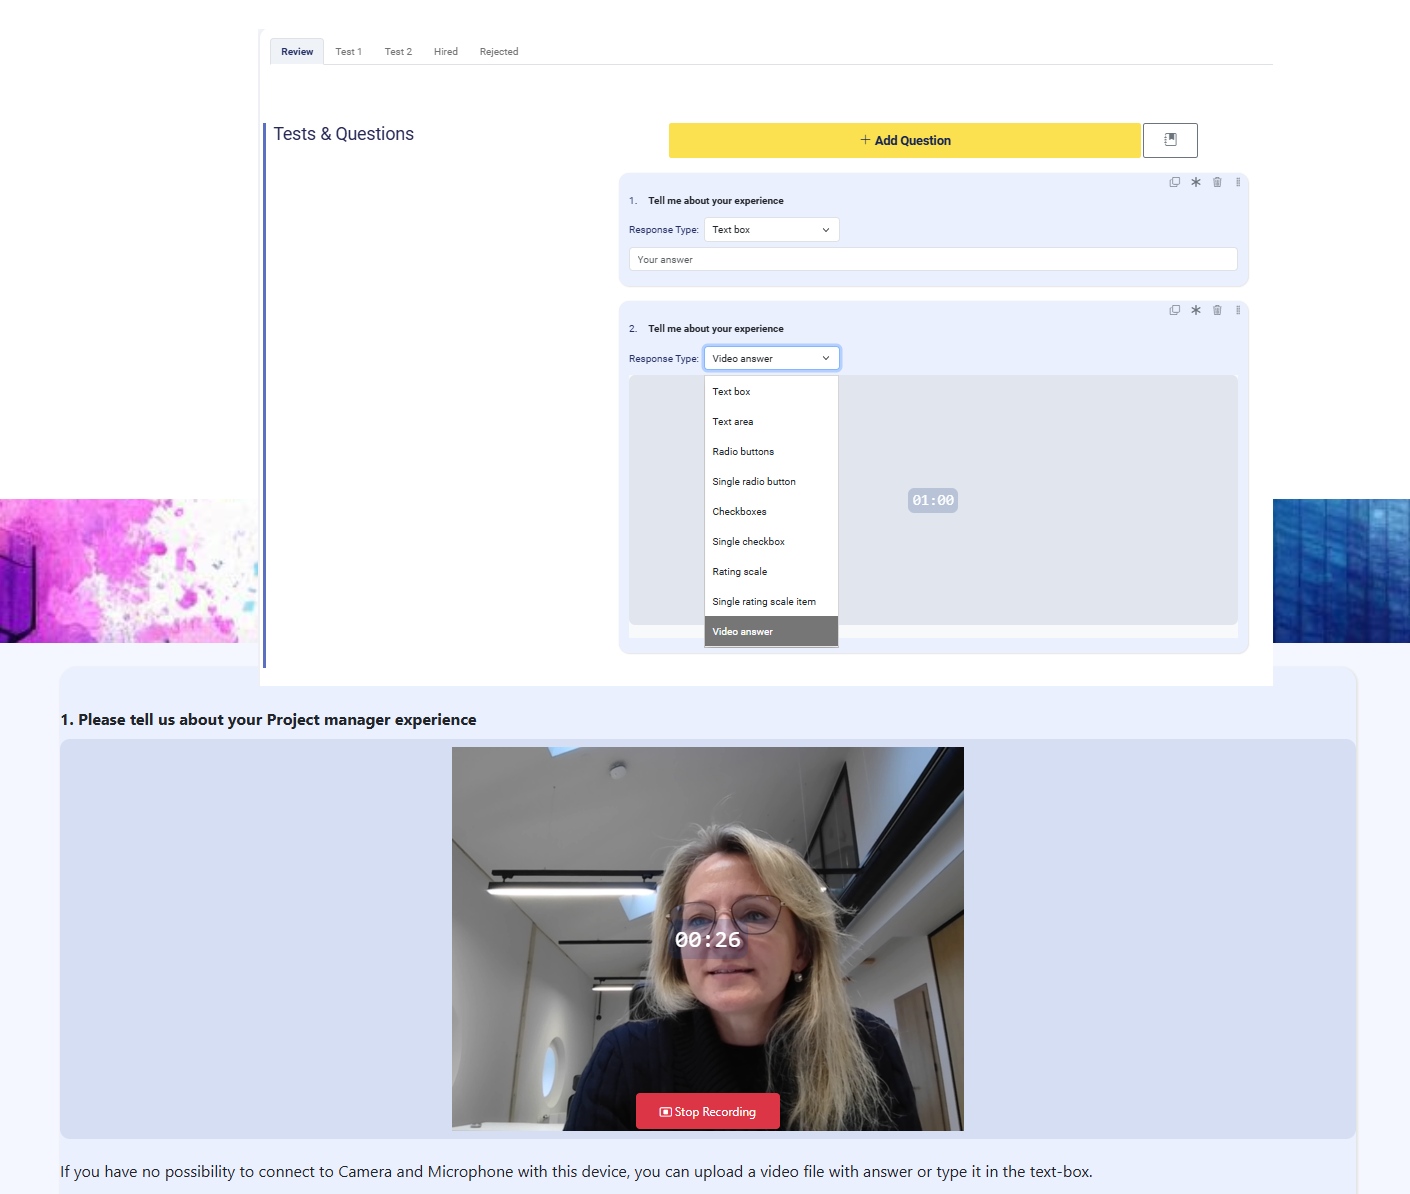
Select the stage where the assessment should happen and activate option – Use tests.
A new question block appears, where you enter:
Question title / text (example: Tell me about your experience).
Choose response type how the candidate should answer. Response types supported in Skilloom are text box (short answer), text area (long answer), choice-based answers, radio buttons (select one option), single radio button (simple yes/no or confirmation), checkboxes (select multiple options, single checkbox (acknowledgement / agreement), rating scale, single rating scale item, video answer (it also will be evaluated as transcript).
Candidates can record a video response directly inside the assessment page. A visible recording timer shows the allowed duration 01:00 min max. Candidate will see also guidance text explaining alternatives if video recording is not possible – upload a video file or type the answer in a text box instead.
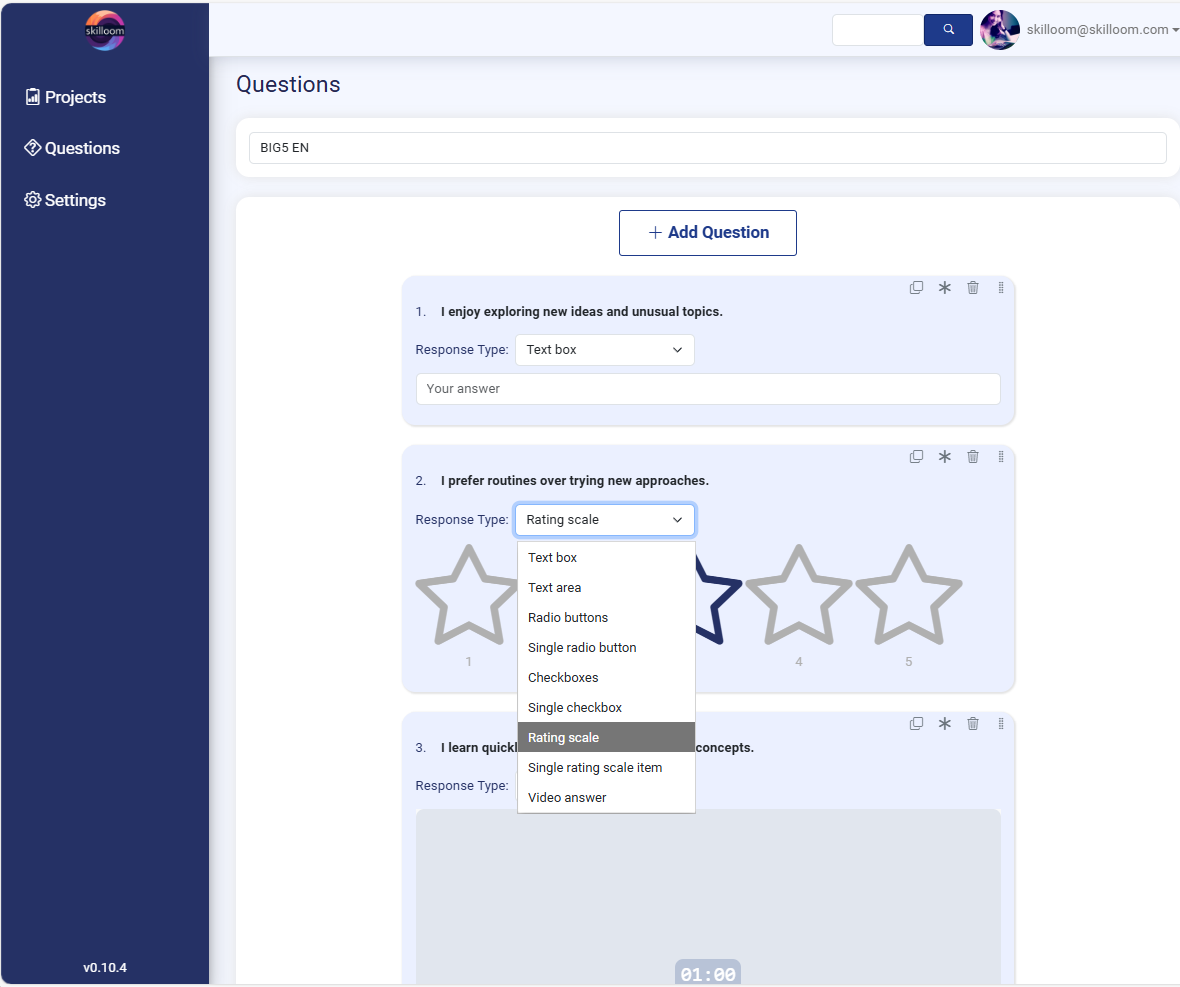
Test templates
You can create test remplates, that can be used across multiple assessment projects. For example DISC tests or BIG5 tests or tests that you are using in company for hiring.
Enter the name of template that will be used for internal needs, to find the needed template in template list.
Choose to add question. A new question block appears, where you enter:
Question title / text (example: Tell me about your experience).
Choose response type how the candidate should answer. Response types supported in Skilloom are text box (short answer), text area (long answer), choice-based answers, radio buttons (select one option), single radio button (simple yes/no or confirmation), checkboxes (select multiple options, single checkbox (acknowledgement / agreement), rating scale, single rating scale item, video answer (it also will be evaluated as transcript).
Candidates can record a video response directly inside the assessment page. A visible recording timer shows the allowed duration 01:00 min max. Candidate will see also guidance text explaining alternatives if video recording is not possible – upload a video file or type the answer in a text box instead.
Questions in template will be saved automatically.
Automations
You can define automated e-mail notifications for candidates at different stages of the hiring process. This ensures candidates receive the right message automatically when their status changes, without manual follow-up.
Skilloom includes stage-based e-mail automation. Each stage can have its own e-mail template, meaning you can send different messages depending on where the candidate is in the process.
E-mail notification setup. Inside the selected stage, Skilloom provides a full e-mail editor where you define e-mail subject, reply-to e-mail, message content and you can use personalization variables – dynamic fields, to greet every applicant by name and/or surname or include assessment link in automated e-mail.
Below the e-mail section, Skilloom also allows setting up what information should be collected from the applicant at that stage.
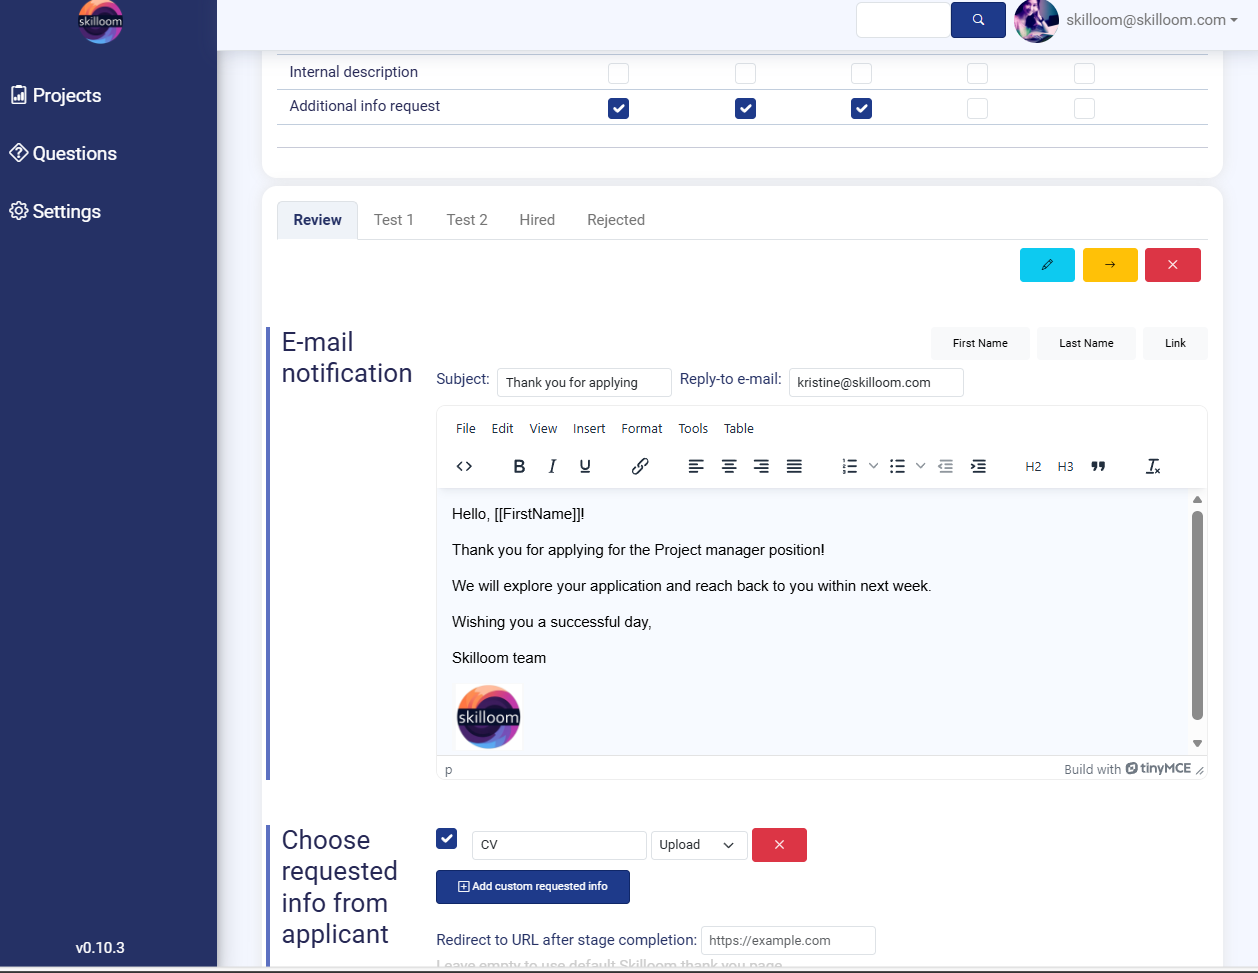
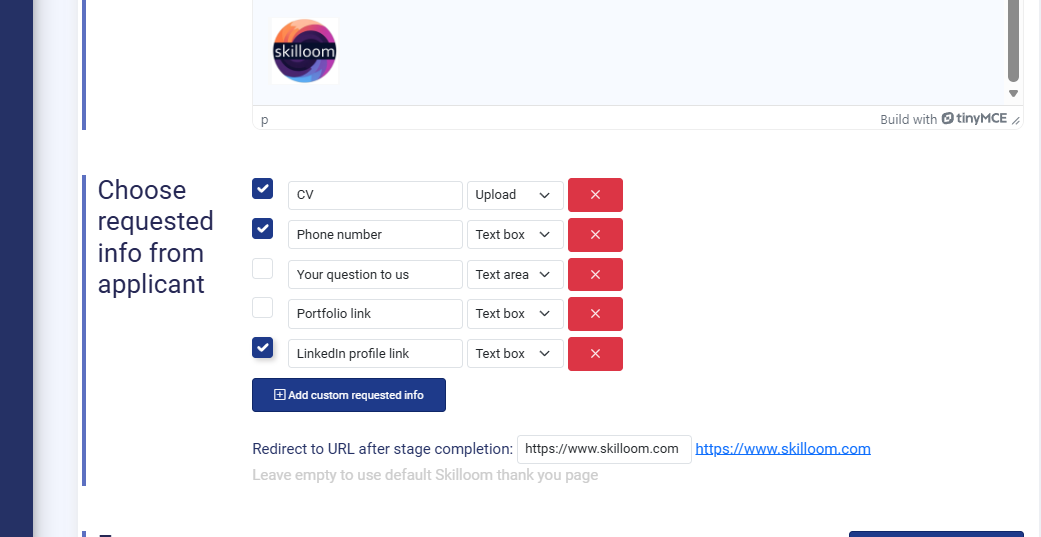
Additional information
In additional Information Request section you choose what extra information the applicant must provide before assessment after opening the assessment link. This helps recruiters collect all required details in a structured way, without asking candidates separately by e-mail.
Each row has a checkbox on the left.
✅ Checked = the field will be requested from the applicant in this stage
⬜ Unchecked = the field will not be shown/requested
You can request any information. Skilloom supports standard response formats/input types as:
Upload – for documents like CVs.
Text box – short text input (e.g., phone number, links).
Text area – longer written responses (e.g., candidate message).
Each field has a red X button on the right side. Clicking it removes that request item from the stage setup.
You can redirect applicant after assessment completion to custom URL. It will happen after 10 seconds after completion message. If you leave it empty, Skilloom uses the default thank-you page.
This is useful if you want to send candidates to, for example, a company webpage, booking link, onboarding instructions or additional information page.
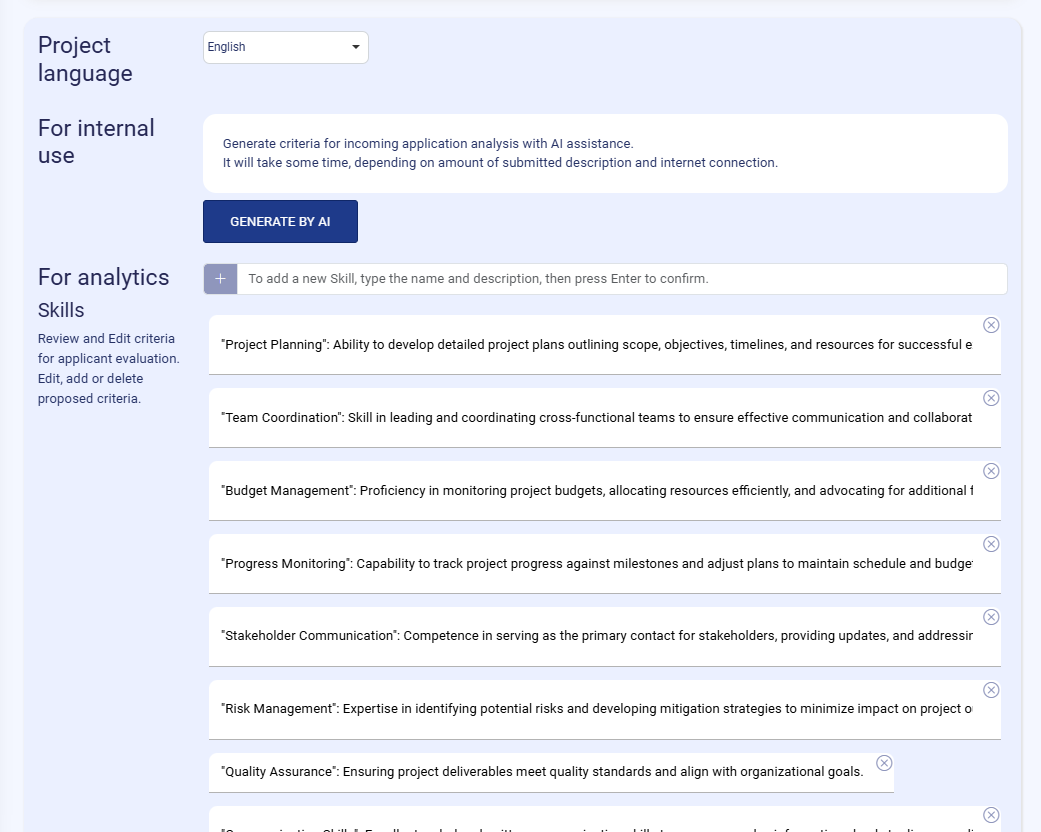
Evaluation criteria
When all information is entered, you can request Skilloom to create applicant evaluation criteria. Skilloom creates applicant evaluation criteria automatically with AI. You can fully customize them to match your role requirements. This creates a structured skill-based evaluation model that HR teams can use consistently when reviewing candidates.
To create automatic evaluation criteria creation with AI, choose the project language. This ensures the generated criteria and descriptions are created in the correct language for your team. These criteria are only for internal system and team use, they are not visible to applicants.
Click “GENERATE BY AI”.
Skilloom creates a set of recommended skills / evaluation criteria based on the project and role description you provided earlier.
The system informs the user that generation may take some time, depending on the amount of text and connection speed. Usually it takes 15-25 seconds.
The generated criteria appear under For analytics → Skills, where each skill is shown as:
Skill name (in quotes, e.g., “Project Planning”).
Skill description explaining what should be evaluated (e.g., planning scope, timelines, resources).
These skills become the foundation for applicant scoring, structured evaluation and reporting. It enables consistent decision-making across candidates.
Skilloom gives full flexibility to adjust the AI suggestions delete criteria, edit them and add new criteria manually. At the top of the list, there is an input bar with a “+” button and instruction text: Type a skill name and description and press Enter to confirm.
This means AI output is not fixed — it is a starting point that HR can refine. You can also define more instructions for automatic evaluation in Internal description of the stage, for example, evaluation instructions for BIG5 test result interpretation. The system will take in account these instructions and provide you ready results.
All information that is sent to analysis is anonymous and processed in secure API requests.

Date
Each hiring project can have an end date that defines how long the project stays active and when the application period should close. This helps HR teams plan timelines and manage recruitment deadlines clearly.
To setting the project end date open the date selector and select the end date of project.
In the project setup, you can set the end date using a calendar field.
Clicking the date field opens a calendar picker (as shown in the screenshot).
Select the month and year and the exact day.
The selected date is displayed in the date field below the calendar.
After the date expiration the applicant will not be able to apply or fill out the assessment, they will see an announcement informing them that the project has ended.
After choosing the end date, click “COMPLETE” to save and confirm the project configuration.
Analysis
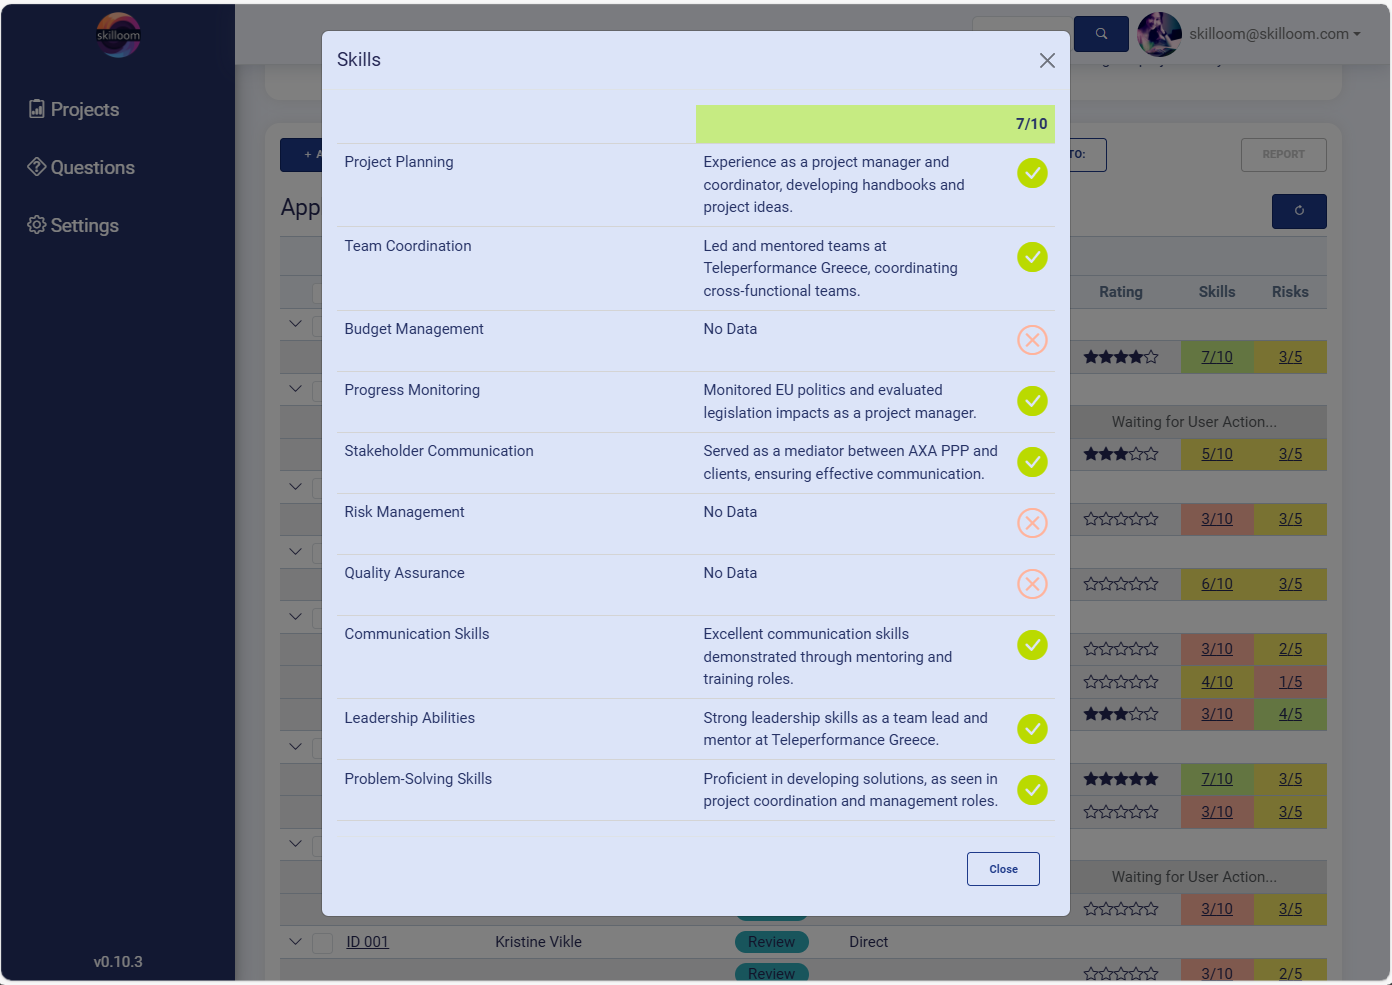
When applicant applies for the position and completes the assessment the results are collected in Skilloom an imideatelly sent to analysis. It means tgat after second from receiving the application data you will be able to review ready context analysis data.
When you open the applicant’s Skills analysis window, Skilloom displays:
Overall Skills Score at the top of the window you see a total skills score that summarizes how many skills system has supported with context from assessment results, answers and documents that were added to the application.
It creates a table with skills breakdown with evidence. Skilloom lists each evaluation criterion (skill) and context from applicant data that is a short explanation of what the candidate provided that supports this skill.
Status indicator
✅ Green check = Skilloom found relevant supporting evidence.
❌ Red cross = No Data (the applicant did not provide information for this skill).
This gives HR immediate clarity on which skills are covered and which require follow-up questions.
With this skills context view, HR can quickly compare candidates using consistent criteria, identify missing information early (No Data skills) and decide whether to move the candidate forward, request more details or reject based on gaps and additional document review.
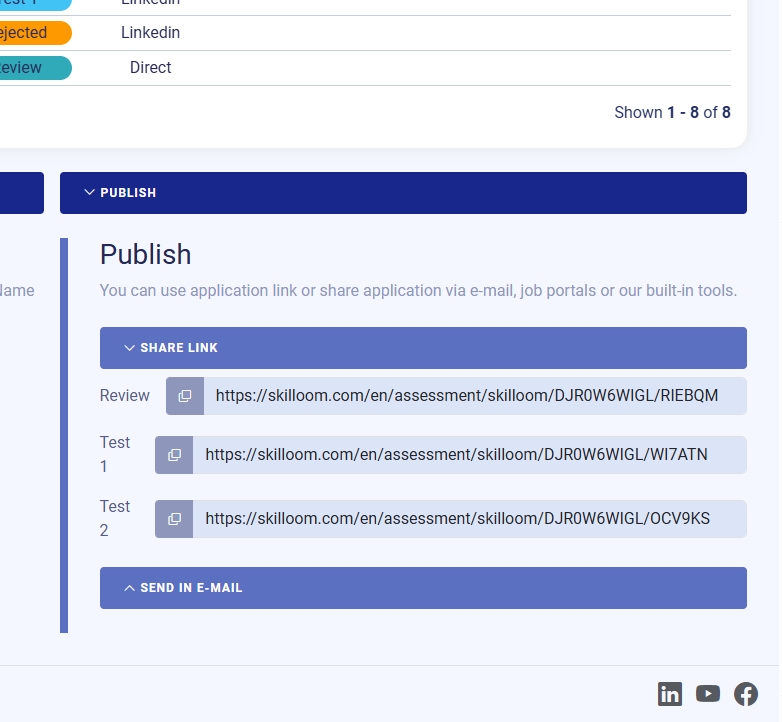
Share and publish
Publish section is located in Project overview page and includes links, when the project main information is completed. It allows you to publish the process externally in publication, job portal and send candidates directly to the correct stage assessment form.
Review link is used for the initial application stage (basic application / first information collection).
All other links are named accordingly to hiring project stages and can be used when a candidate is invited to the first assessment step. This is the link that will be opened, if Link placeholder will be used in e-mail automation while defining the stage.
Each link has a copy icon, allowing you to copy the URL in one click and share it anywhere.
You can also send this link in E-mail sending form using Skilloom in-built form.
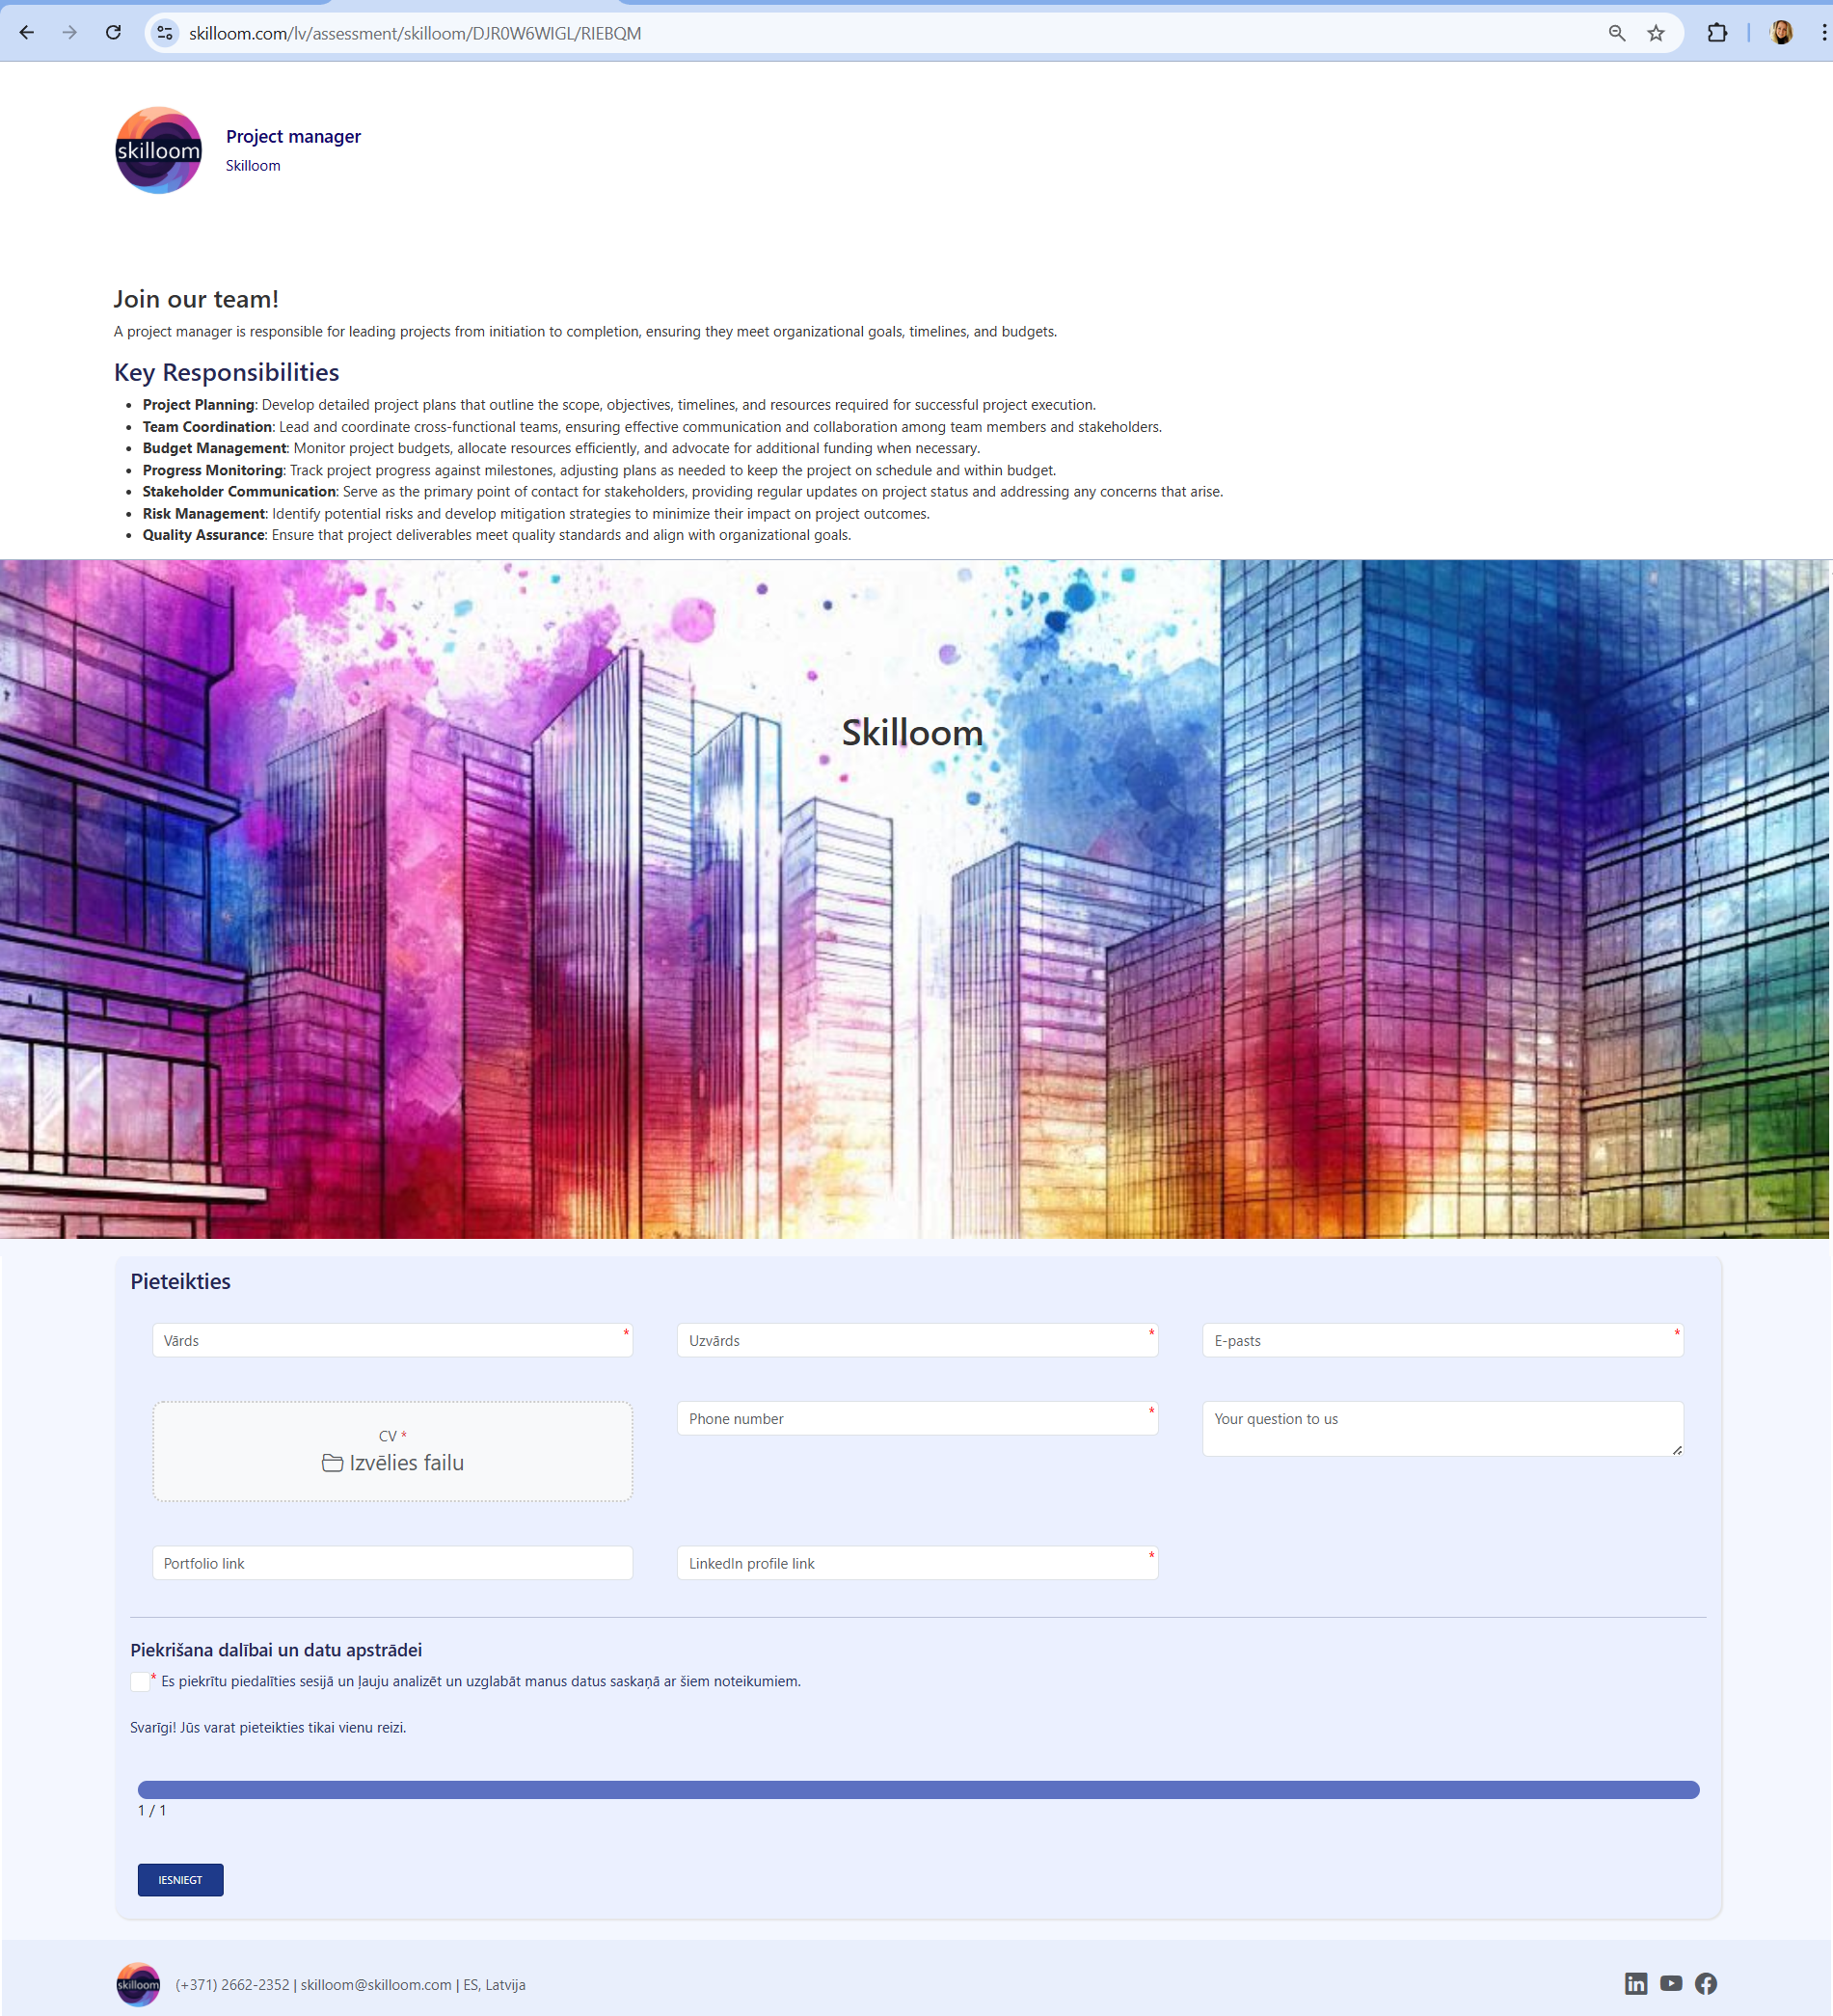
Candidate experience
When link is opened – candidates open a clear, branded application form created by you and complete it step-by-step in a structured flow. The form is designed to be simple to understand, easy to fill in, and consistent across different hiring stages.
When the candidate clicks the shared link, they are taken directly to the correct project stage form.
Before filling in the form, the candidate can read the content provided by you in the design. This gives the candidate context and helps them understand what the role involves.
Below the description, the candidate sees the application section and complete the form fields.
Before starting an assessment or submitting, the candidate must confirm consent to the Terms. A checkbox is provided, ensuring the process follows transparent data handling principles.
There is also an important system message confirming the candidate can submit only once.
At the bottom of the form, Skilloom shows a progress bar, this gives the candidate a clear feeling of completion and reduces uncertainty.
After completing all required staps, the candidate clicks Submit and can rate it’s experience of assessment.
The application is then delivered to the employer’s Skilloom project pipeline, where it can be reviewed and analysed.

Import/export
The Applicants page includes built-in options to import, export and share candidate data for a hiring project. These tools are designed for teams who want to evaluate applicants in Skilloom even if the candidate data was collected elsewhere.
Import options (Add applicants into the project)
1) + ADD (manual / file-based import). This option allows you to add applicants by uploading their data directly into Skilloom by choosing one or several files containing applicant information. You can add several files for the same applicant or multiple files for multiple applicants. But each of these files must include applicant e-mail that will be used as identification of applicant and joining several documents under one applicant. You will see the results of document analysis before adding them to the project. You will be able to cancel the import or confirm it and add applicants to your project.
Skilloom processes the uploaded file and extracts candidate information (example shown: CV file with name, surname, e-mail).You can remove a file from the import list with the X icon.
2) + IMPORT, BULK (mass import via XLSX).
This option is meant for importing many applicants at once using an Excel file. Skilloom offers to download import template with the correct file structure.
Upload an XLSX file with applicant data. The system counts Total unique applicants found in the file.
The Export function allows you to download applicant/project data from Skilloom for reporting or sharing outside the platform.
E-mail option supports sending applicant-related information by e-mail directly from Skilloom to selected applicants.
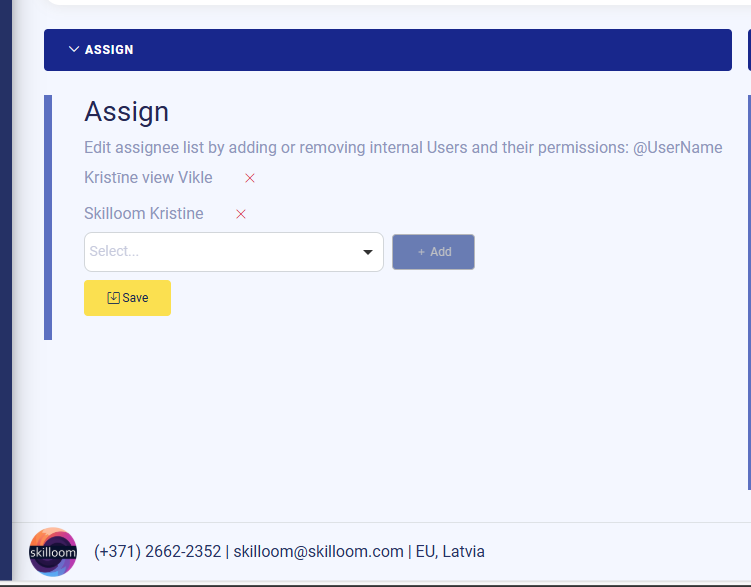
Collaboration
In Skilloom collaboration is managed through Organization Users, Roles (rights) and Assigning users to exact projects. This allows you to invite internal or external team members, control what they can access and give or remove them visibility to specific hiring projects without sharing candidate links manually.
To add new users to your organization go to Settings → Roles and create necessary roles with necessary limitations for Users. The default rights are the most limited rights that allow users to view project without GDPR protected applicant information. By creating new roles you can add rights from lists.
When roles are created you can add new users in Settings → Users.
For each user you can enter username / e-mail, full name and if needed, assign role that adds more than view only rights and time limitation. If no role is set then user has most limited rights for unlimited time period.
You can remove users from Organization, edit their rights and remove them from projects at any time.
When a new user is added Skilloom sends an invitation e-mail to the user.
Inside a project, Skilloom has an Assign section where you control who can access this project. When user is assigned to the project, it sees the project in project list and can manage upon assigned right limitations.
You can remove a user from the project using the X.
You can add a new user using dropdown selector and then saving it.
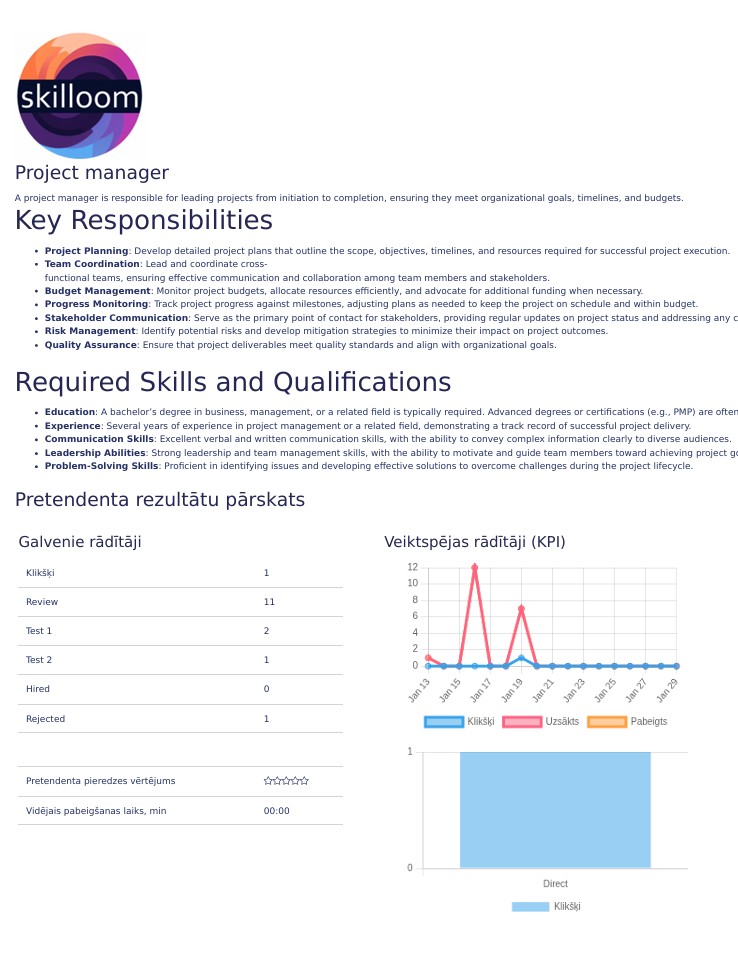
Reports
The Report feature provides a ready-to-use overview of a hiring project by combining the vacancy information with key recruitment performance data. It helps HR teams quickly evaluate how the hiring process is progressing and what results the project has produced.
The Skilloom report helps users to deliver main project data for external needs .
Setting up the Onboarding plan
In Skilloom the Onboarding Plan is created based on the resources your company can actually provide to a new employee (internal materials, people support, sessions, tools, etc.).
Important! Onboarding plan can be created only for applicants that have CV or other experience description document added to their profile while applying to the position or importing applicant documents. And assessed skills information for the role.
To create the onboarding plan, open the applicant profile, by clicking on applicant’s ID in project application list. Choose Onboarding section and you will see “Resources for onboarding”.
This is the place where you manage the building blocks that Skilloom will use for the onboarding plan.
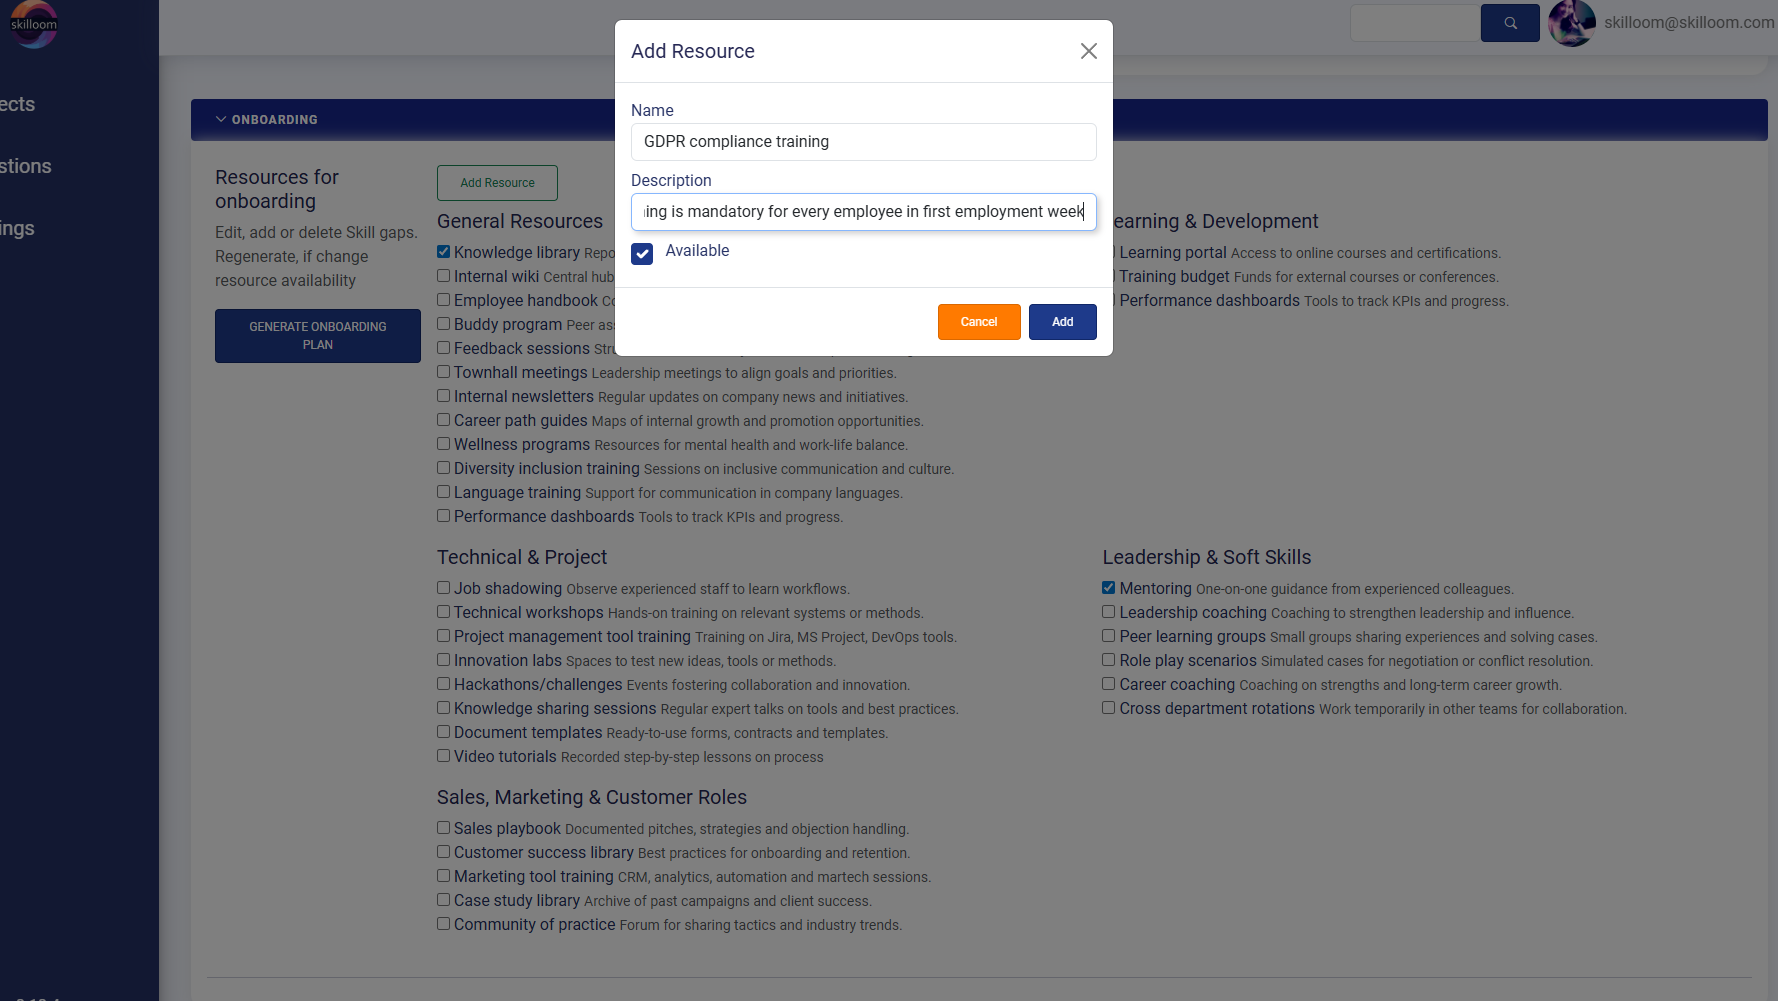
Select 1-3 available onboarding resources.
Or add your own custom resource (optional) if it is not available in the list. Click “Add Resource”. A window opens where you enter:
1. Name (example: GDPR compliance training).
2. Description (short explanation of what it is and when it should be done).
3. Available checkbox (to confirm the resource can be used right now).
Click “Add” to save the resource or “Cancel” to close without saving.
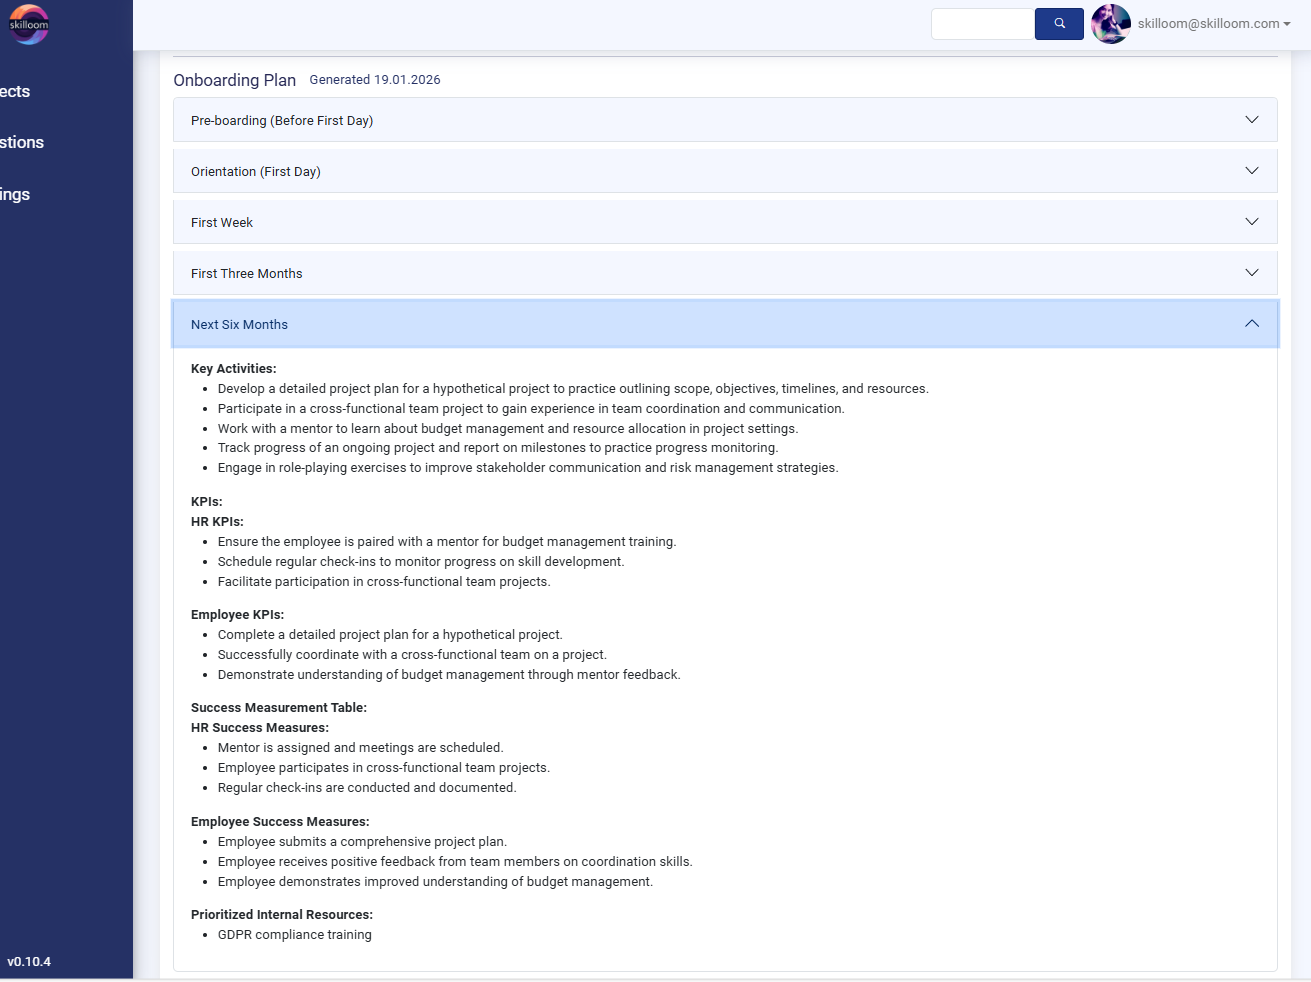
Generate the Onboarding plan
Once your resources are selected, click “Generate onboarding plan”. The generation process involves several AI agents that analyses the skill-gaps of the applicant and creates structured, clear and practical 30-60-90 day onboarding plan you can adapt for yourself or a new hire.
Important! The generation process lasts from 2-5 minutes, so you can grab a coffee or do other jobs and return when it is ready for your review.
Skilloom generates an onboarding plan that is aligned with the resources you marked as available.
If something changes (for example, a resource is no longer available), you can update the resources and regenerate the onboarding plan.
The system also supports adjusting the plan if there are new results in skill assessment or changes in the job description. Then regenerate the plan.
Learning plan
In Skilloom, the Learning Plan is generated as a ready-to-use set of learning recommendations for a selected employee, role and based on training the employee according to identified and individual skill-gaps.
Important! Learning plan can be created only for applicants that have CV or other experience description document added to their profile while applying to the position or importing applicant documents. And assessed skills information for the role.
To create the learning plan, open the applicant profile, by clicking on applicant’s ID in project application list. Open the Learning Plan section
Click the button “Generate Learning Plan”.
Important! The generation process lasts from 2-5 minutes, so you can grab a coffee or do other jobs and return when it is ready for your review
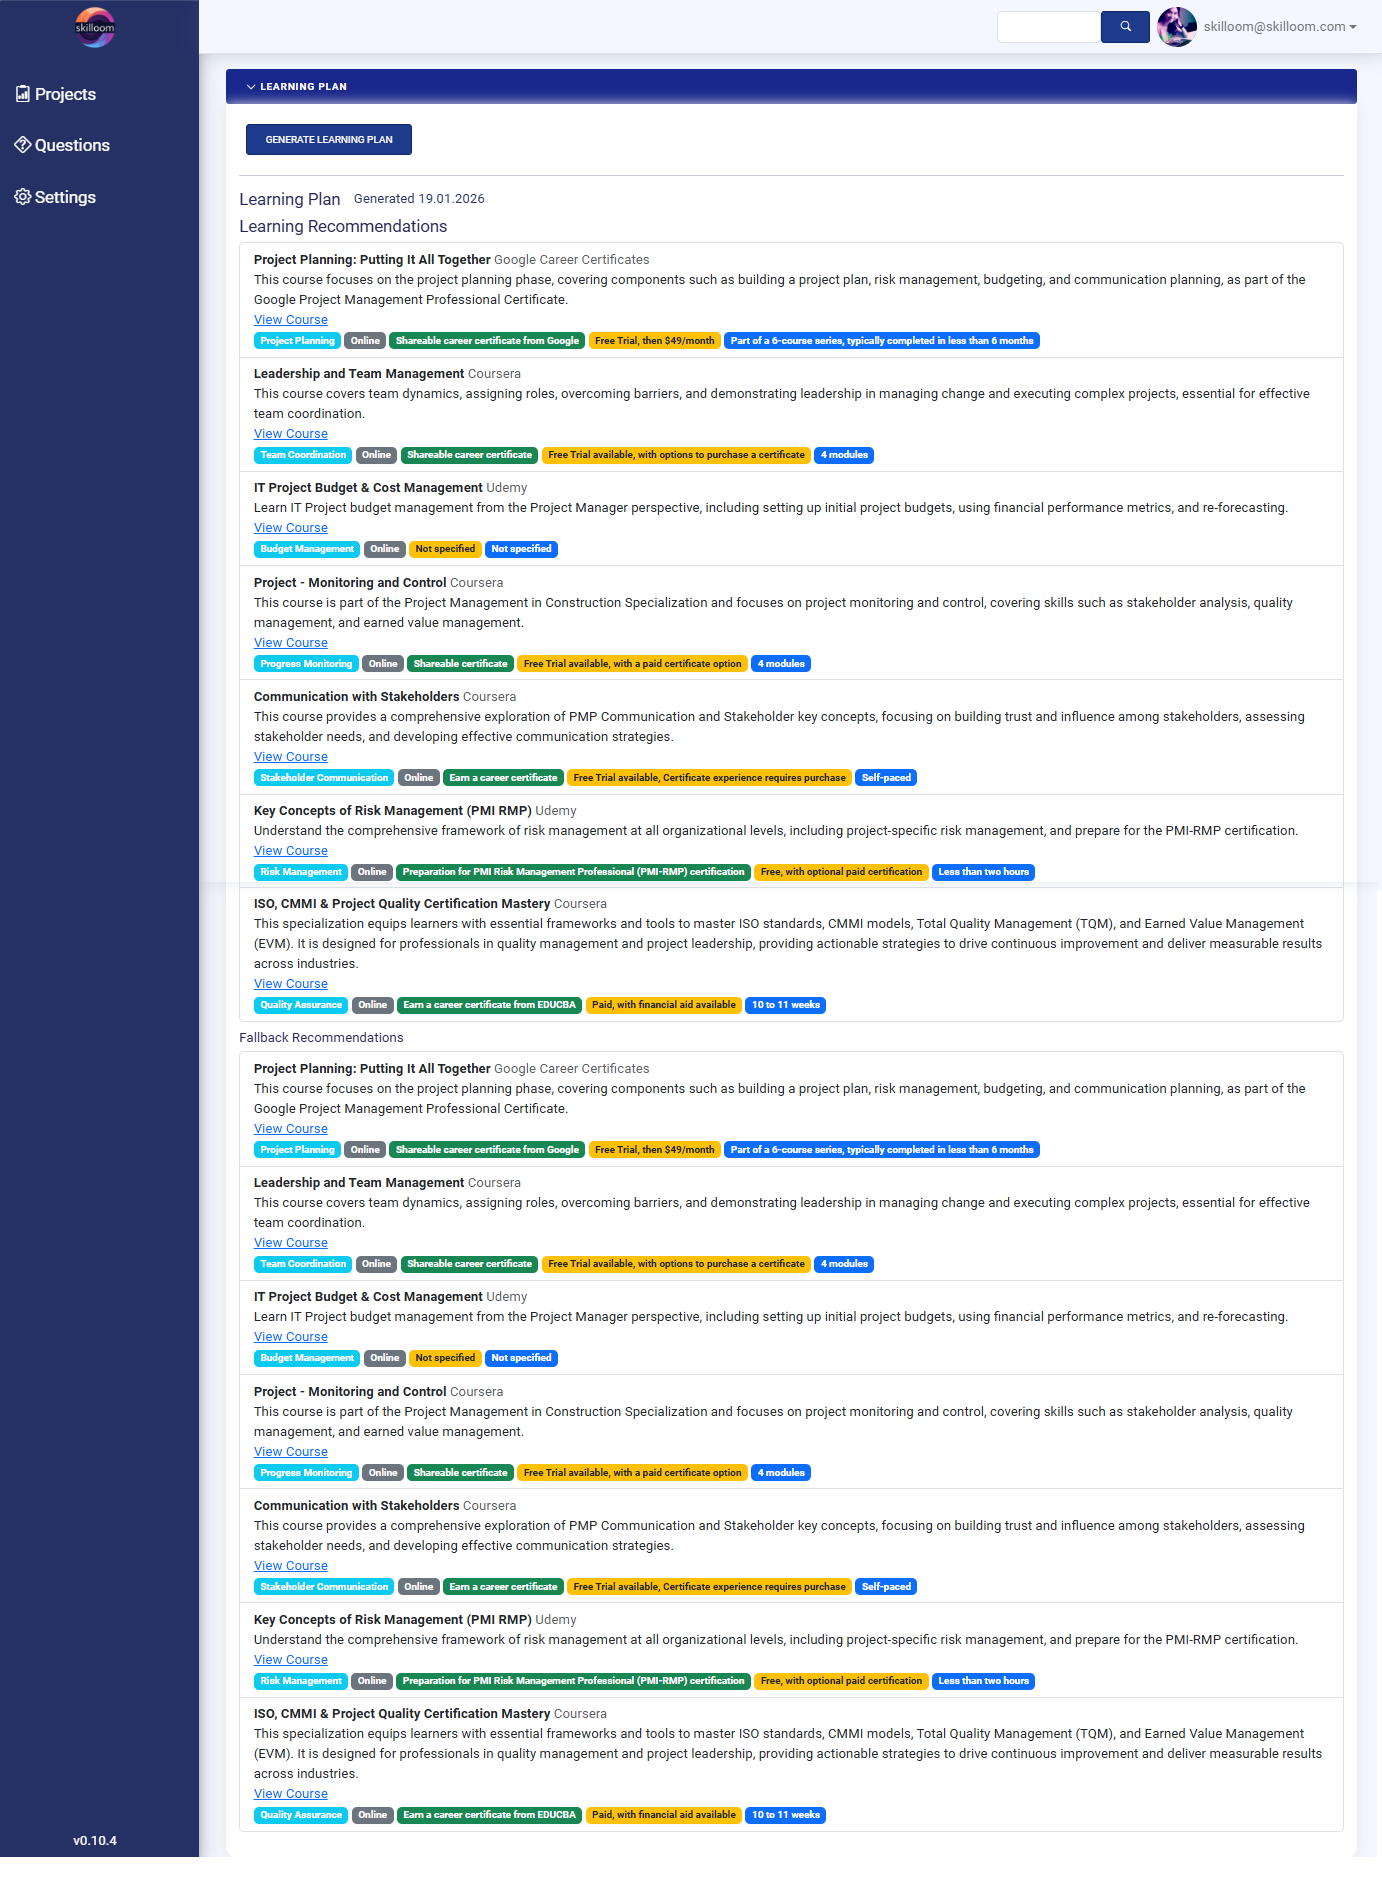
Skilloom creates a list of recommended learning resources (mainly online courses and certifications).
After generation, the plan shows the timestamp “Generated [date]” (example in the screenshot: Generated 19.01.2026).
The plan is displayed as a list of learning items (course cards).
Each item contains:
1. Course title (example: Project Planning: Putting It All Together)
2. Provider platform (example: Google Career Certificates, Coursera, Udemy)
3. Short description explaining what the course covers and why it is useful
4. “View Course” link to open the course details
5. Tags that help understand the course format and value, such as:
5.1. topic/skill area (e.g., Project Planning, Risk Management)
5.2. learning type (Online, Self-paced)
5.3. certificate availability (Career certificate, Paid certificate option)
5.4. duration or structure (4 modules, 10–11 weeks)
5.5. price/trial notes (Free trial available, etc.)
If some of the main recommendations are unavailable or not suitable, Skilloom provides a “Fallback Recommendations” section.
This gives alternative options with similar skill focus, so the user always has learning options available.
Upon individual request individual adjustments to course catalogues can be made that Skilloom uses to create learning plan. It can use Organizations internal learning lists or other resources.
Next step in career
Next Career Step Plan helps HR and managers create a clear, structured career progression plan for an employee based on the company context and the employee’s long-term goals.
Important! Next career step plan can be created only for applicants that have CV or other experience description document added to their profile while applying to the position or importing applicant documents. And assessed skills information for the role.
How the Next Career Step Plan is created.
To create the next career step plan, open the applicant profile, by clicking on applicant’s ID in project application list. Open “Next Career Step” section.
This section is used to generate role and development recommendations for the employee’s next career move.
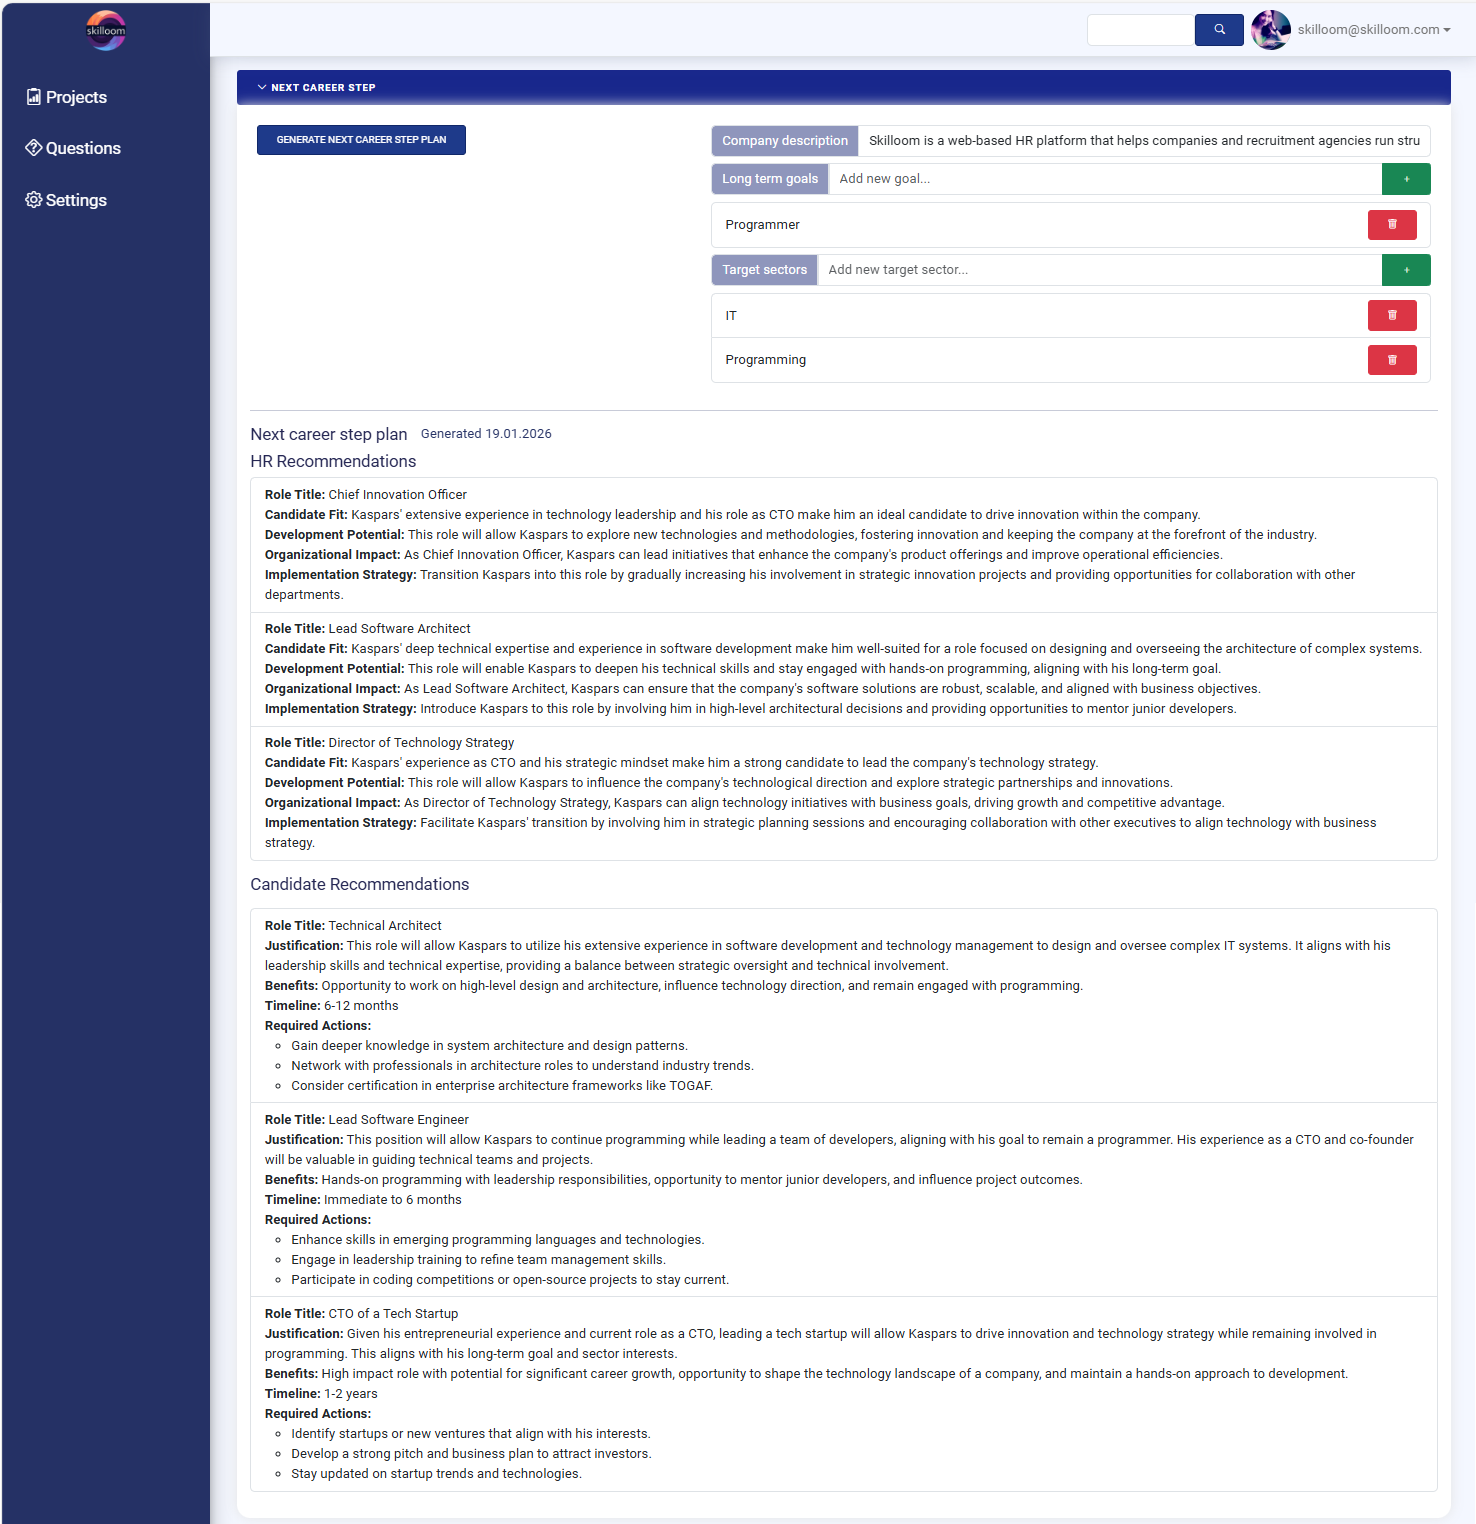
Before generating the plan add the context Skilloom needs:
1. A short description of the company (example shown: Skilloom company description). This helps the system tailor recommendations to the organization’s environment and opportunities.
2. Long-term goals. You can add one or more long-term career goals (example: Programmer, less stress, higher salary, next career level in the same company).
3. Target sectors. You can add industries the employee wants to work in (example: IT, Programming).
Generate the Next Career Step Plan by clicking “Generate Next Career Step Plan”.
Important! The generation process lasts from 2-5 minutes, so you can grab a coffee or do other jobs and return when it is ready for your review
The system generates the plan and shows the date/time of creation (example: Generated 19.01.2026).
The plan contains two main parts HR Recommendation and Candidate Recommendations.
HR Recommendations. This section suggests suitable next roles from the employer’s perspective.
For each role, Skilloom provides structured reasoning, including:
1. Role Title (example: Chief Innovation Officer, Lead Software Architect)
2. Candidate Fit (why the person matches the role)
3. Development Potential (how the role supports growth)
4. Organizational Impact (how it benefits the company)
5. Implementation Strategy (how to transition the employee into the role)
Candidate Recommendations. This section focuses on the employee’s perspective and includes practical action steps.
For each recommended career step, Skilloom provides:
1. Role Title
2. Justification (why it fits the employee’s goals and profile)
3. Benefits (what the employee gains)
4. Timeline (example: Immediate to 6 months, 6–12 months, 1–2 years)
5. Required Actions (clear next steps such as learning, networking, certifications, or projects)
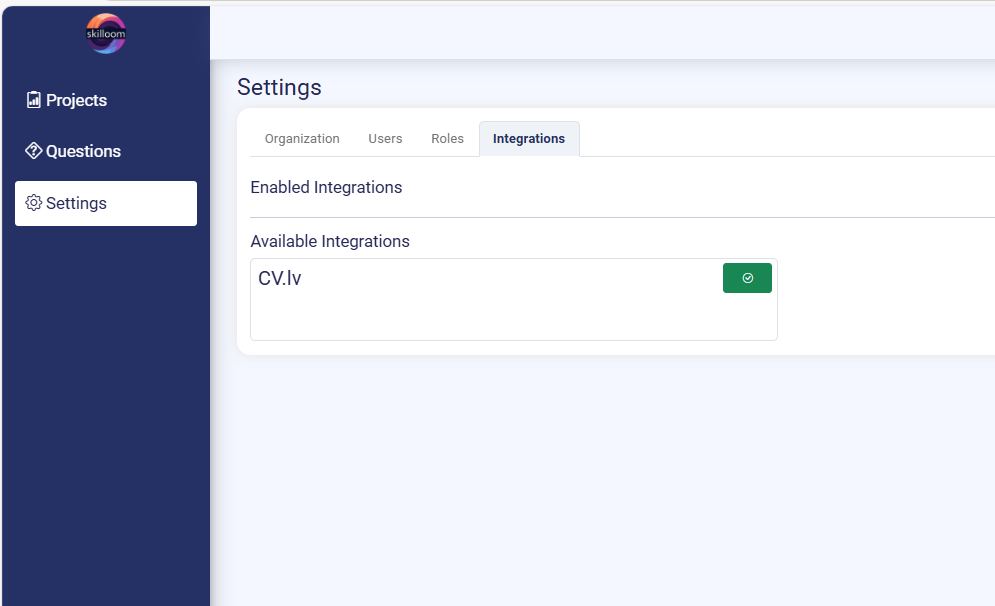
Integrations
Feel free to contact our Sales or Support for instructions or development of custom integrations. Mainly we manage integrations using REST API.
Ready integration with cv.lv job add portal allows you to receive applicant information in Skilloom and analyse them as direct applications.
Important
Onboarding, learning and next career step plans can be created only for applicants that have CV or other experience description document added to their profile while applying to the position or importing applicant documents. And assessed skills information for the role.
Brand – the brand or campaign name used for the project will be included in application link, so do not change it after you publish the project, as this may cause the inaccessible application link.
Delete / remove the project. You will be able to remove the project. It is possible only if there are no applications or assigned users. If project already has applications, you have to delete them first and remove active user Invites to be able to delete the project.
Our partners and integrations
There you can find some of our HR an IT partners that can help with HR processes, mentoring and digitalization processes.
Frequently Asked Questions
How many applicants can I accept in each of subscription plans?
There is no restriction on applicant amount that you can accept in your hiring projects. As we know that it is crucial to have them all aplied and analyzed. The restriction is on storage amount that is the factor, that will be used if many applicants apply. Our calculations show, that 100 applicants will use from 20 to 95 GB of storage place. You can delete Hiring projects that have ended or add extra storage place to your plan.
How much data and for how long can it be stored?
The amount of data you can store permanently depends on your subscription plan: Start (50 GB), Growing (200 GB), or Stability (500 GB). Users can temporarily exceed their storage limit by up to 100 GB for a maximum of 4 weeks. After this period, you must upgrade your plan, purchase additional storage, or delete old projects to free up space. Each plan also specifies the number of users and active projects allowed.
How do you take care for data security and protection?
We ensure data security and protection by complying with GDPR regulations and conducting regular system audits. Data is encrypted both in transit and at rest, and we implement robust access controls and user authentication. Our data backup and disaster recovery procedures safeguard against data loss, and we provide regular security training for our staff. Additionally, we have a comprehensive incident response plan to quickly address any potential data breaches.
What information is the AI assistant analyzing about candidates?
The AI assistant analyzes various candidate-provided information resources such as CVs, motivation letters, LinkedIn profiles, and portfolios. It also examines textual answers to test questions and transcripts from video responses. This analysis helps assess qualifications, skills, and suitability for the role, providing structured insights while ensuring data privacy and security.